Connect a Dataverse Table to Power BI
Introduction
Microsoft Dataverse is a cloud-based data storage service that provides a structured way to manage and store business data. Power BI, a powerful data visualization tool, allows users to connect to Dataverse and create insightful reports. This guide will walk you through connecting a Dataverse table to Power BI Desktop using the Common Dataverse Service (Legacy) connector.
Prerequisites
Before you begin, ensure you have the following:
- A Microsoft Power BI Desktop installed on your computer.
- Access to a Microsoft Dataverse environment.
- Required permissions to read Dataverse tables.
Step-by-Step Guide
Step 1: Open Power BI Desktop
Launch Power BI Desktop on your computer. If you don’t have it installed, download it from the official Microsoft website.
Step 2: Get Data from Dataverse
- Click on Home in the ribbon.
- Select Get Data and then choose More….
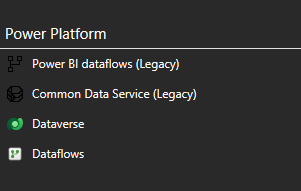
- In the search box, type “Dataverse” and select Common Data Service (Legacy).
- Click Connect.
Step 3: Sign In to Dataverse
- A pop-up window will appear asking you to sign in.
- Use your Microsoft credentials associated with your Dataverse environment.
- Once authenticated, you will see a list of available Dataverse tables.
Step 4: Select the Required Table
- Browse through the list or search for the specific table you want to import.
- Click on the table and then select Load to import it directly into Power BI.
- Alternatively, you can choose Transform Data to open Power Query Editor for data cleaning and modifications before loading.
Step 5: Transform Data (Optional)
If needed, perform data transformations in Power Query Editor:
- Remove unnecessary columns.
- Change data types.
- Filter or merge data with other sources. Once satisfied, click Close & Apply to load the transformed data into Power BI.
Step 6: Build Reports and Visualizations
- Use the Fields pane to drag and drop columns onto the report canvas.
- Select visualization types like tables, charts, or maps.
- Apply filters and slicers to enhance data exploration.
- Format visuals for better readability.
Step 7: Publish the Report
Once your report is ready:
- Click on File > Save As and save your Power BI file.
- If you want to share it, click Publish and select the Power BI Service workspace.
- Users with appropriate permissions can now access the published report online.
Step 8: Connect Using the Dataverse Option
If you prefer to connect using the newer Dataverse option:
- Click on Home in the ribbon.
- Select Get Data and then choose More….
- In the search box, type “Dataverse” and select Dataverse instead of Common Data Service (Legacy).
- Click Connect and sign in with your Microsoft credentials.
- Choose the table you need and either Load it directly or use Transform Data for additional modifications.
- Follow the same steps for building reports and publishing as described above.
Connect a Dataverse Table to Power BI dashboard
Connect a Dataverse Table to Power BI repot
✨ Thanks for reading! ✨
I hope you found this blog on the Microsoft Power Platform helpful! From Power Apps, Power Automate (Cloud & Desktop), Canvas Apps, Model-driven Apps, Power BI, Power Pages, SharePoint, Dynamics 365 (D365), Azure, and more, I cover a wide range of topics to help you harness these powerful tools. Don’t miss out on future tips, tutorials, and insights—hit that subscribe button to get the latest posts right to your inbox. 💌
💬 I’d love to hear your thoughts! Drop a comment below with your questions, ideas, or feedback—let’s get the conversation started!
🔗 Let’s connect and grow together!
Follow me, Sanika Thorat, on your favorite platforms for even more content and updates on Microsoft Power Platform and related technologies:
- 💼 LinkedIn – Let’s network and share ideas!
- 💻 GitHub – Explore my projects and code.
- Email Id – thoratsanika98@gmail-com
Let’s build something amazing together with Power Platform and Azure! 🚀
Hey team savinj.com,
I would like to discuss SEO!
I can help your website to get on first page of Google and increase the number of leads and sales you are getting from your website.
May I send you a quote & price list?
Bests Regards,
Anky
Lets Get You Optimize
Accounts Manager
http://www.letsgetuoptimize.com
Phone No: +1 (949) 508-0277
Hi,
I’m Manshi, and I’m part of a leading SEO company based in India.
We specialize in achieving top rankings for our clients’ websites on Google and other major search engines, ensuring high revenue and top page rank within a guaranteed 3-4 months.
We’re excited to present you with a special SEO package that includes:
•Detailed Website Audit
•Keyword research
•Competitor Analysis
•Meta tags optimizations
•Content Optimization
•Article Posting(Weekly)
•Blog Posting
•Guest Posting
•Article Submissions
•Blog Submissions
•Heading tag changes
•Alt tag changes
•Interlinking wherever required.
•Keyword Density in site content.
•HTML Site Map
•XML site map and Submission in webmaster tool
•Link Building & Marketing
If you’re interested, we’d love to analyze your website and suggest the best strategy for you. Please share your website URL along with up to 10 keywords to get started.
Looking forward to your positive reply.
Best regards,
Manshi
Business Development Manager
WebxTalk Pvt. Ltd.
При выборе серверов стоит учитывать xrumer proxy, которые обеспечивают анонимность.
Hi,
I hope you’re doing well. We’re excited to offer our website design services to help you build a modern, user-friendly, and SEO-optimized website tailored to your needs.
With our custom website package, you’ll receive:
✅ Custom Layout Design for a unique look
✅ SEO Semantic HTML Code for better search rankings
✅ Back-end Management for easy updates
✅ Integrated Contact Forms & Live Chat for engagement
✅ Google Translator & WhatsApp Chat for accessibility
✅ News, Blog, and Testimonials Management
✅ Social Media Buttons & Newsletter Integration
✅ Jobs Management & SEO Plugin
✅ Google Analytics, Location Map & XML Sitemap
✅ Up to 5 Hours of Website Training
Let’s discuss how we can bring your vision to life. Looking forward to your thoughts!
Best regards,
Manshi Sharma
Hi,
Do you want to grow your business by ranking higher on Google?
I’m Sonam, an SEO Manager with 8 years of expertise in improving website visibility and driving sales. I’d love to share details of our SEO packages and previous successes that demonstrate how we can help your website reach the top of Google search results.
If this sounds interesting, please provide your website and the keywords you’re targeting. I’ll draft a personalized plan tailored to your business needs.
I look forward to connecting with you soon.
Best Regards,
Manshi Sharma
Hi,
Trust you’re well.
“We are a team of creative web designers and developers, specializing in attractive, mobile-friendly, and user-centered websites.”
We can design/re-design a unique website for your organization as well for a very affordable cost.
May I send you a quote? If interested.
Best Regards,
Deepa Gupta
Hii, Please send on jravindra553@gmail.com
Hi,
Just had a look at your site – it’s well-designed, but not performing well in search engines.
Would you be interested in improving your SEO and getting more traffic?
I can send over a detailed proposal with affordable packages.
Warm regards,
Nikita
Hii, Please send on jravindra553@gmail.com
Hello,
I hope you’re doing well. We’re excited to offer our website design services to help you build a modern, user-friendly, and SEO-optimized website tailored to your needs.
With our custom website package, you’ll receive:
✅ Custom Layout Design for a unique look
✅ SEO Semantic HTML Code for better search rankings
✅ Back-end Management for easy updates
✅ Integrated Contact Forms & Live Chat for engagement
✅ Google Translator & WhatsApp Chat for accessibility
✅ News, Blog, and Testimonials Management
✅ Social Media Buttons & Newsletter Integration
✅ Jobs Management & SEO Plugin
✅ Google Analytics, Location Map & XML Sitemap
✅ Up to 5 Hours of Website Training
Let’s discuss how we can bring your vision to life.
Looking forward to your thoughts!
Thank You,
Nikita
Hi https://savinj.com/contact-us,
I represent a social media marketing agency that creates 15 engaging posts per month for businesses like yours.
Our clients typically see a 40-60% increase in followers and engagement for just $199/month.
Would you be interested?
Thank You,
Niketa
Hi https://savinj.com/contact-us,
I specialize in creating clean, responsive website designs that help businesses make a strong first impression online. If you can share your website link, I’ll take a quick look and suggest how it can be improved for better engagement and results.
Can I share a few design suggestions for your site? Please share you’r Website Link and Whatsapp Number.
Thank You,
Sachin
Having gone through a similar experience myself, I found your insights particularly validating. You captured emotions I struggled to articulate, which made me feel less alone in my journey. Thank you for sharing something so personal.
Thanks for sharing this valuable information.