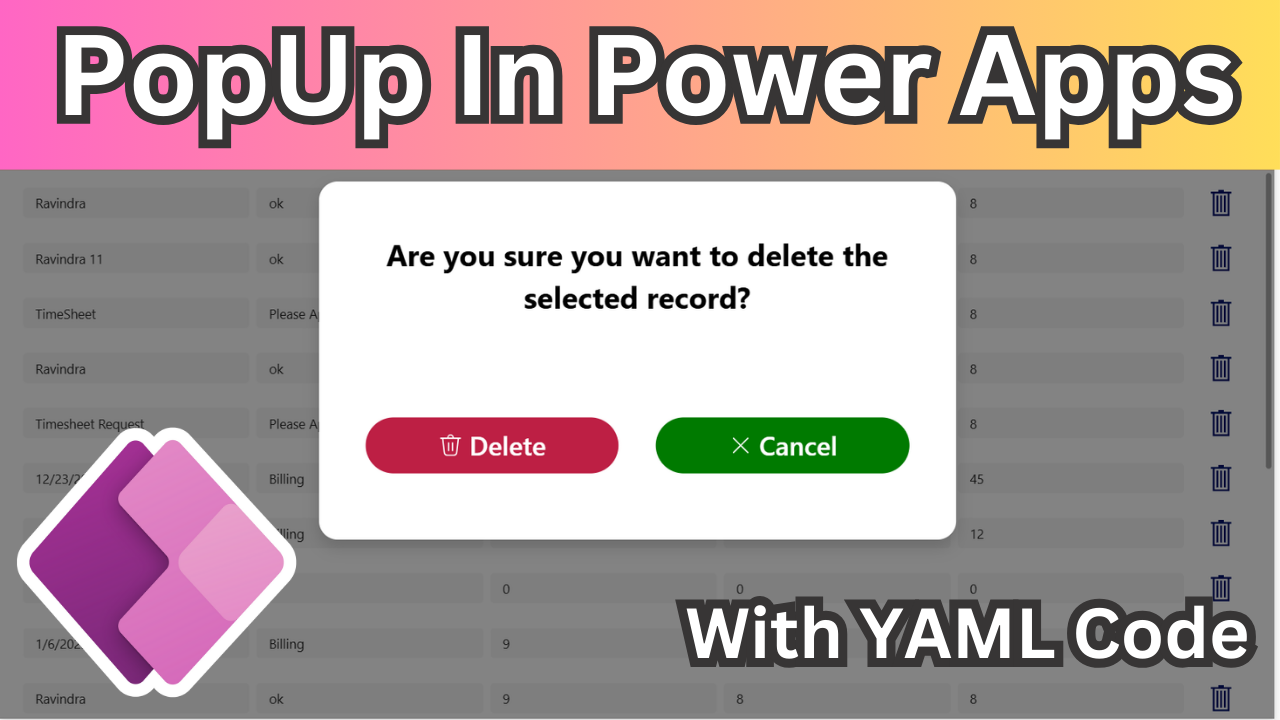
How to Create Popup In Power Apps
. In this article, we’ll walk you through creating a delete confirmation popup in Power Apps.
Steps to Create a Delete Popup
In Gallery Add the Trash Icon
On Select Property Of Trash Icon add below Formulas
UpdateContext({lclPopup:true,lclitem:ThisItem})From the Insert menu, add a Rectangle, then set its Width and Height to Parent.width and Parent.height. Position it by setting X and Y to 0.
Additionally, change the Fill property to RGBA(0, 0, 0, 0.49).
Step 3
Add Vertical Container and Set Below Propertys
X: (Parent.Width-Self.Width)/2

Y: (Parent.Height-Self.Height)/2

Width: Parent.Width/1.5

height: Parent.Height/15

Fill: Color.White

Padding:10
Add Horizontal Container and Label inside Vertical Container
On Label Text Property Add
"Are you sure you want to delete the selected record?"Step 5
Add Button In Horizontal Container
- ButtonCanvas10:
    Control: Button
    Properties:
      OnSelect: =Remove(TimeEntries,lclitem);Notify("Record Deleted Successfully",NotificationType.Success)
      BasePaletteColor: =RGBA(249, 83, 109, 1)
      BorderRadius: =60
      FontSize: =28
      Icon: ="Delete"
      PaddingLeft: =0
      PaddingRight: =0
      Text: ="Delete"
      AlignInContainer: =AlignInContainer.Center
      FillPortions: =1
      Height: =60
Step 6 Add Cancel Button
- ButtonCanvas10_1:
    Control: Button
    Properties:
      OnSelect: =UpdateContext({lclPopup:false})
      BasePaletteColor: =RGBA(8, 222, 8, 1)
      BorderRadius: =60
      FontSize: =28
      Icon: ="Dismiss"
      PaddingLeft: =0
      PaddingRight: =0
      Text: ="Cancel"
      AlignInContainer: =AlignInContainer.Center
      FillPortions: =1
      Height: =60

Complete Code
- Container4:
    Control: GroupContainer
    Variant: verticalAutoLayoutContainer
    Properties:
      DropShadow: =DropShadow.Semibold
      Fill: =RGBA(255, 255, 255, 1)
      Height: =Parent.Height/2
      LayoutDirection: =LayoutDirection.Vertical
      LayoutMode: =LayoutMode.Auto
      PaddingBottom: =10
      PaddingLeft: =10
      PaddingRight: =10
      PaddingTop: =10
      RadiusBottomLeft: =20
      RadiusBottomRight: =20
      RadiusTopLeft: =20
      RadiusTopRight: =20
      Visible: =lclPopup
      Width: =Parent.Width/2
      X: =(Parent.Width-Self.Width)/2
      Y: =(Parent.Height-Self.Height)/2
    Children:
    - TextCanvas4:
        Control: Text
        Properties:
          Align: ='TextCanvas.Align'.Center
          AutoHeight: =true
          FontColor: =RGBA(0, 0, 0, 1)
          Size: =32
          Text: ="Are you sure you want to delete the selected record?"
          VerticalAlign: =VerticalAlign.Middle
          Weight: ='TextCanvas.Weight'.Bold
          AlignInContainer: =AlignInContainer.Stretch
          FillPortions: =1
    - Container5:
        Control: GroupContainer
        Variant: horizontalAutoLayoutContainer
        Properties:
          Height: =45
          LayoutGap: =40
          LayoutMode: =LayoutMode.Auto
          PaddingBottom: =40
          PaddingLeft: =40
          PaddingRight: =40
          PaddingTop: =40
        Children:
        - ButtonCanvas10:
            Control: Button
            Properties:
              OnSelect: =Remove(TimeEntries,lclitem);Notify("Record Deleted Successfully",NotificationType.Success)
              BasePaletteColor: =RGBA(249, 83, 109, 1)
              BorderRadius: =60
              FontSize: =28
              Icon: ="Delete"
              PaddingLeft: =0
              PaddingRight: =0
              Text: ="Delete"
              AlignInContainer: =AlignInContainer.Center
              FillPortions: =1
              Height: =60
        - ButtonCanvas10_1:
            Control: Button
            Properties:
              OnSelect: =UpdateContext({lclPopup:false})
              BasePaletteColor: =RGBA(8, 222, 8, 1)
              BorderRadius: =60
              FontSize: =28
              Icon: ="Dismiss"
              PaddingLeft: =0
              PaddingRight: =0
              Text: ="Cancel"
              AlignInContainer: =AlignInContainer.Center
              FillPortions: =1
              Height: =60
Thank You Everyone!
Keywords and SEO
Create Popup In Power Apps
Create Popup In Power Apps
Create Popup In Power Apps
Create Popup in power apps 2025
Creating Delete Popup in 2025 power apps
Creating popup in power apps using modern controls
how to Create popup in power apps
#DeletePopup #PowerApps #ModernUI #PopupDesign
Power Apps popup, create popup in Power Apps, Power Apps UI, Power Apps modal, Power Apps 2025, low-code popups, Power Apps delete popup, confirmation popup Power Apps, delete modal Power Apps, Power Apps 2025 best practices,Modern controls Power Apps, Power Apps popup design, Power Apps UI updates, Power Apps interactive modals,How to create popup Power Apps, Power Apps modal window, Power Apps UI tips, Power Apps pop-up tutorial
Enhance your Power Apps with a delete confirmation popup to prevent accidental deletions and improve data security in 2025.
🔹 SEO Sentence:
Learn how to create a delete popup in Power Apps 2025 to add an extra layer of confirmation before deleting important records.
🔹 Short Description:
Use modern controls in Power Apps to create a stylish and user-friendly popup for better app functionality and user engagement.
🔹 SEO Sentence:
Upgrade your Power Apps UI with modern controls to create an interactive and responsive popup experience.
🔹 Short Description:
Step-by-step guide on how to create a popup in Power Apps to improve app interaction and usability.
🔹 SEO Sentence:
Learn how to create a popup in Power Apps easily and efficiently with this beginner-friendly guide.
✨ Thanks for reading! ✨
I hope you found this blog on the Microsoft Power Platform helpful! From Power Apps, Power Automate (Cloud & Desktop), Canvas Apps, Model-driven Apps, Power BI, Power Pages, SharePoint, Dynamics 365 (D365), Azure, and more, I cover a wide range of topics to help you harness these powerful tools. Don’t miss out on future tips, tutorials, and insights—hit that subscribe button to get the latest posts right to your inbox. 💌
💬 I’d love to hear your thoughts! Drop a comment below with your questions, ideas, or feedback—let’s get the conversation started!
🔗 Let’s connect and grow together!
Follow me, Sanika Thorat, on your favorite platforms for even more content and updates on Microsoft Power Platform and related technologies:
- 💼 LinkedIn – Let’s network and share ideas!
- 💻 GitHub – Explore my projects and code.
- Email Id – thoratsanika98@gmail-com
Let’s build something amazing together with Power Platform and Azure! 🚀


2 thoughts on “Create Popup In Power Apps”