Cascading Dropdowns in a Model-Driven App (Without Coding)
Introduction
Cascading dropdowns are a very common requirement in enterprise applications. A classic example is Country → State → City, where the available values in one field depend on the selection made in another field. In traditional development approaches, this logic is usually implemented using JavaScript or custom code. However, with Power Apps model-driven apps, Microsoft Dataverse provides powerful no-code capabilities—such as relationships, form-level filtering, and business rules—that allow you to implement cascading dropdowns without writing a single line of code.
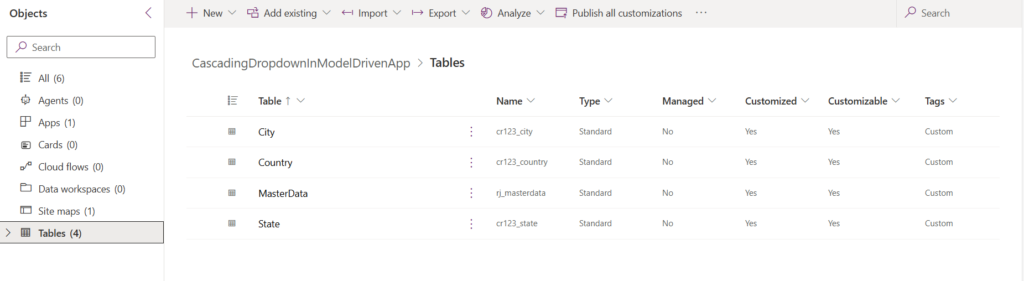
In this article, we will build a fully functional cascading dropdown experience in a model-driven app using four Dataverse tables:
- Country
- State
- City
- MasterData (transaction / parent table)
We will achieve the following behavior:
- Initially, only the Country field is visible.
- When a Country is selected, the State field becomes visible.
- When a State is selected, the City field becomes visible.
- The State lookup shows only states related to the selected country.
- The City lookup shows only cities related to the selected state.
All of this will be implemented using:
- Dataverse one-to-many relationships
- Lookup filtering on model-driven forms
- Business Rules for show/hide logic
No JavaScript. No plugins. No Power Automate flows.
Prerequisites
Before starting, make sure you have:
- Access to Power Apps with permissions to create and customize Dataverse tables
- A model-driven app environment
- Basic understanding of:
- Dataverse tables
- Columns (fields)
- Relationships
- Model-driven forms
High-Level Architecture
Let’s first understand the data model and how the tables relate to each other.
Tables Overview
| Table Name | Purpose |
|---|---|
| Country | Stores list of countries |
| State | Stores states/provinces related to a country |
| City | Stores cities related to a state |
| MasterData | Main table where cascading dropdowns are used |
Relationship Design
We will use one-to-many (1:N) relationships:
- Country (1) → State (N)
- State (1) → City (N)
- Country (1) → MasterData (N)
- State (1) → MasterData (N)
- City (1) → MasterData (N)
This structure allows:
- Each State to belong to one Country
- Each City to belong to one State
- MasterData records to reference Country, State, and City
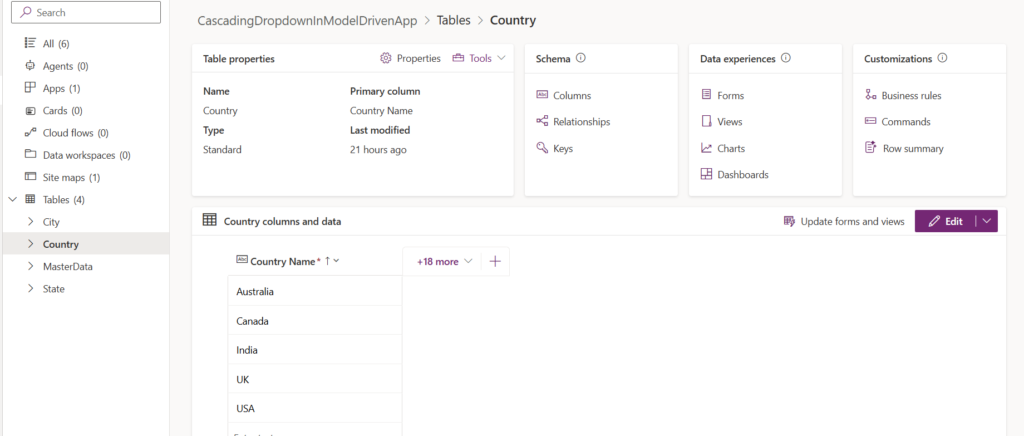
Step 1: Create the Country Table
- Go to Power Apps → Dataverse → Tables
- Click + New table
- Enter:
- Table name: Country
- Primary column: Country Name
- Save the table
Add Sample Columns (Optional)
You may add optional columns such as:
- Country Code
- ISO Code
For this implementation, the primary name column is sufficient.
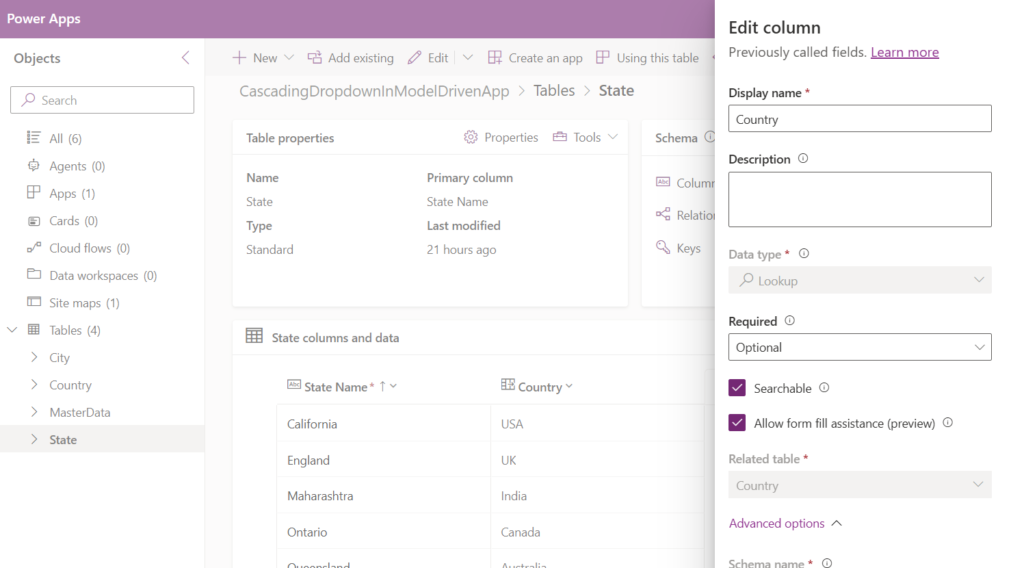
Step 2: Create the State Table
- Create a new table named State
- Primary column: State Name
Create Relationship: Country → State
- Open the State table
- Go to Relationships
- Click + Add relationship → Many-to-one
- Configure:
- Related table: Country
- Relationship name: Country (States)
- Save and publish
This relationship ensures that each state belongs to one country.
Step 3: Create the City Table
- Create a new table named City
- Primary column: City Name
Create Relationship: State → City
- Open the City table
- Go to Relationships
- Add Many-to-one relationship
- Configure:
- Related table: State
- Relationship name: State (Cities)
- Save and publish
Step 4: Create the MasterData Table
The MasterData table is where users will select Country, State, and City.
- Create a new table named MasterData
- Primary column: Title
Add Lookup Columns
Add the following lookup columns:
| Column Name | Data Type | Lookup Table |
|---|---|---|
| Country | Lookup | Country |
| State | Lookup | State |
| City | Lookup | City |
Create Relationships Automatically
When you create lookup columns, Dataverse automatically creates the required relationships:
- Country (MasterData)
- State (MasterData)
- City (MasterData)
Step 5: Configure the MasterData Main Form
- Open MasterData table
- Go to Forms → Main form
- Add the following fields in order:
- Title
- Country
- State
- City
At this stage, all fields will be visible and unfiltered.
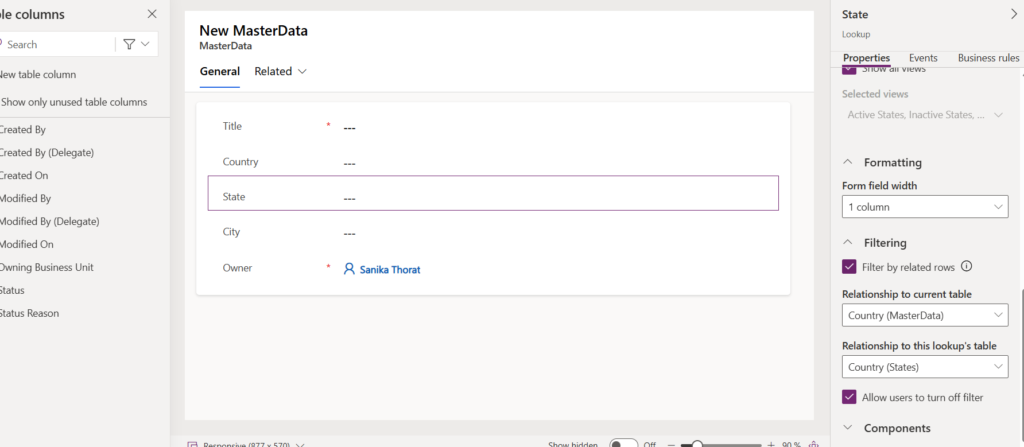
Step 6: Configure Lookup Filtering (Cascading Behavior)
This step ensures that State and City dropdowns show only relevant records.
Filter State Based on Country
- Select the State field on the form
- Open the Properties pane
- Go to Filtering section
- Enable Filter by related rows
Configure the relationships:
- Relationship to current table: Country (MasterData)
- Relationship to this lookup’s table: Country (States)
This configuration means:
Only states whose Country matches the selected Country in MasterData will be shown.
Filter City Based on State
- Select the City field
- Enable Filter by related rows
- Configure:
- Relationship to current table: State (MasterData)
- Relationship to this lookup’s table: State (Cities)
Now, the City dropdown depends on the selected State.
Step 7: Create Business Rules for Show/Hide Logic
Now we will control field visibility using Business Rules.
Why Use Business Rules?
Business rules allow you to:
- Show or hide fields
- Set field values
- Enforce validation
All without writing code.
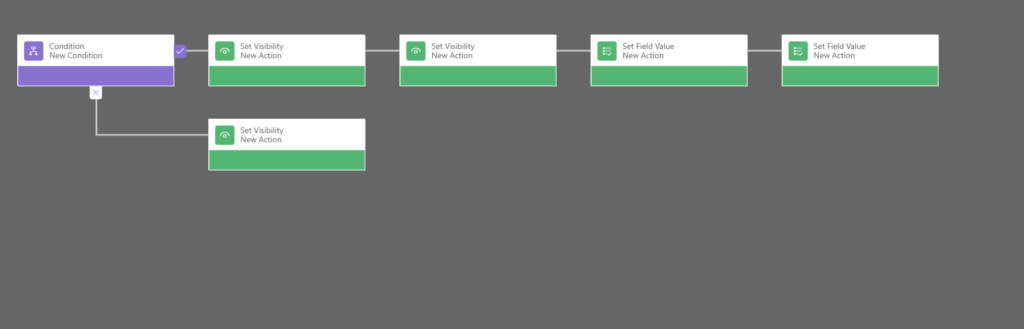
Business Rule 1: Show State When Country Is Selected
Rule Logic
- Condition: Country contains data
- If true:
- Show State field
- If false:
- Hide State field
- Hide City field
Steps to Create
- Open MasterData table
- Go to Business rules → + New business rule
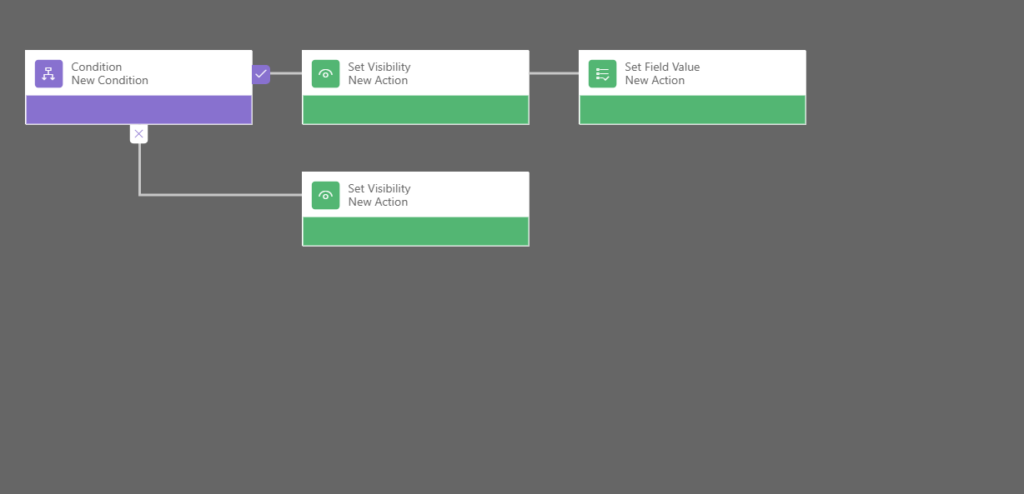
- Add a Condition:
- Field: Country
- Operator: Contains data
- Under True branch:
- Add Set Visibility action
- Field: State
- Visibility: Show
- Under False branch:
- Add Set Visibility → State → Hide
- Add Set Visibility → City → Hide
- Save and activate the rule
Business Rule 2: Show City When State Is Selected
Rule Logic
- Condition: State contains data
- If true:
- Show City field
- If false:
- Hide City field
Steps
- Create another business rule
- Add condition:
- Field: State
- Operator: Contains data
- True branch:
- Set Visibility → City → Show
- False branch:
- Set Visibility → City → Hide
- Save and activate
Step 8: Optional – Clear Dependent Fields Automatically
To avoid invalid data, you can optionally clear State and City when Country changes.
Example Logic
- When Country changes:
- Clear State
- Clear City
This can be done using Set Field Value actions inside business rules.
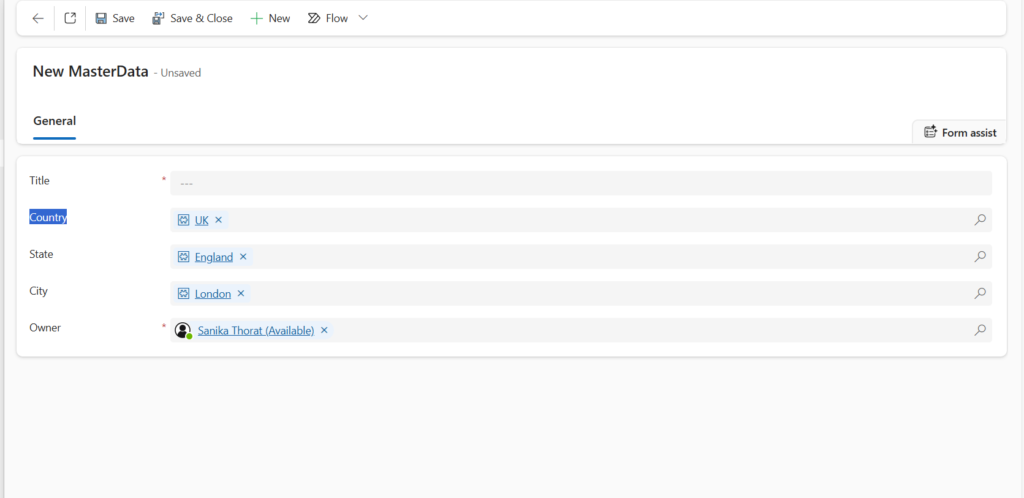
Step 9: Test the Cascading Dropdown
- Open the MasterData model-driven app
- Create a new record
Expected Behavior
- Only Country is visible initially
- Select a Country
- State becomes visible
- State lookup shows only states of selected country
- Select a State
- City becomes visible
- City lookup shows only cities of selected state
Common Issues and Troubleshooting
Issue 1: State or City Shows All Records
Cause: Incorrect relationship selected in filtering
Fix:
- Recheck:
- Relationship to current table
- Relationship to lookup table
Issue 2: Fields Not Hiding or Showing
Cause: Business rule scope or logic
Fix:
- Ensure business rule is:
- Activated
- Applied to Entity (All Forms) or correct form
Issue 3: City Visible Before State
Cause: Missing or incorrect business rule
Fix:
- Verify that City visibility depends only on State
Best Practices
- Always hide dependent fields initially
- Clear dependent lookups when parent changes
- Use consistent naming for relationships
- Test with multiple data scenarios
- Keep business rules simple and focused
Conclusion
Using Dataverse relationships, lookup filtering, and business rules, you can easily build cascading dropdowns in a model-driven app without any coding. This approach is:
- Maintainable
- Scalable
- Fully supported by Microsoft
- Beginner-friendly
This Country → State → City example can be extended to many other scenarios such as:
- Category → Subcategory → Product
- Department → Team → Employee
- Region → Area → Branch
With these no-code techniques, you can deliver rich, dynamic user experiences in Power Apps model-driven apps while keeping your solution clean and future-proof.
Happy building with Power Apps! 🚀
✨ Thanks for reading! ✨
I hope you found this blog on the Microsoft Power Platform helpful! From Power Apps, Power Automate (Cloud & Desktop), Canvas Apps, Model-driven Apps, Power BI, Power Pages, SharePoint, Dynamics 365 (D365), Azure, and more, I cover a wide range of topics to help you harness these powerful tools. Don’t miss out on future tips, tutorials, and insights—hit that subscribe button to get the latest posts right to your inbox. 💌💬 I’d love to hear your thoughts! Drop a comment below with your questions, ideas, or feedback—let’s get the conversation started!🔗 Let’s connect and grow together!
Follow me, Ravindra Jadhav, on your favorite platforms for even more content and updates on Microsoft Power Platform and related technologies:
💼 LinkedIn – Let’s network and share ideas!
💻 GitHub – Explore my projects and code.
🐦 Twitter – Stay updated with quick tips and industry news.
📺 YouTube – Watch tutorials and deep dives on Power Platform, Power Apps, Power Automate, and more! Let’s build something amazing together with Power Platform and Azure! 🚀
SEO DATA
Cascading Dropdowns in a Model-Driven App
Cascading Dropdowns in a Model-Driven App
Cascading Dropdowns in a Model-Driven App
Cascading Dropdowns in a Model-Driven App
Cascading Dropdowns in a Model-Driven App
Cascading Dropdowns in a Model-Driven App
Cascading Dropdowns in a Model-Driven App
Cascading Dropdowns in a Model-Driven App
Cascading Dropdowns in a Model-Driven App
Cascading Dropdowns in a Model-Driven App
Cascading Dropdowns in a Model-Driven App
Cascading Dropdowns in a Model-Driven App
cascading dropdown in model-driven app
Power Apps cascading dropdown
Dataverse cascading lookup
no code cascading dropdown Power Apps
model-driven app cascading dropdown
Dataverse lookup filtering
cascading lookup Dataverse
Power Apps model-driven app tutorial
Dataverse business rules
no code Power Apps solution
how to create cascading dropdown in Power Apps
Power Apps without coding
model-driven app lookup filter example
Dataverse relationships one to many
Power Apps business rules example
Cascading Dropdowns in a Model-Driven App