Building a Connected Agents in Copilot Studio New Agent Builder
Organizations increasingly use AI agents not only to answer questions but also to connect users with the right person. A connected agent offers a clean way to separate this engagement process from the responsibilities of a primary agent.
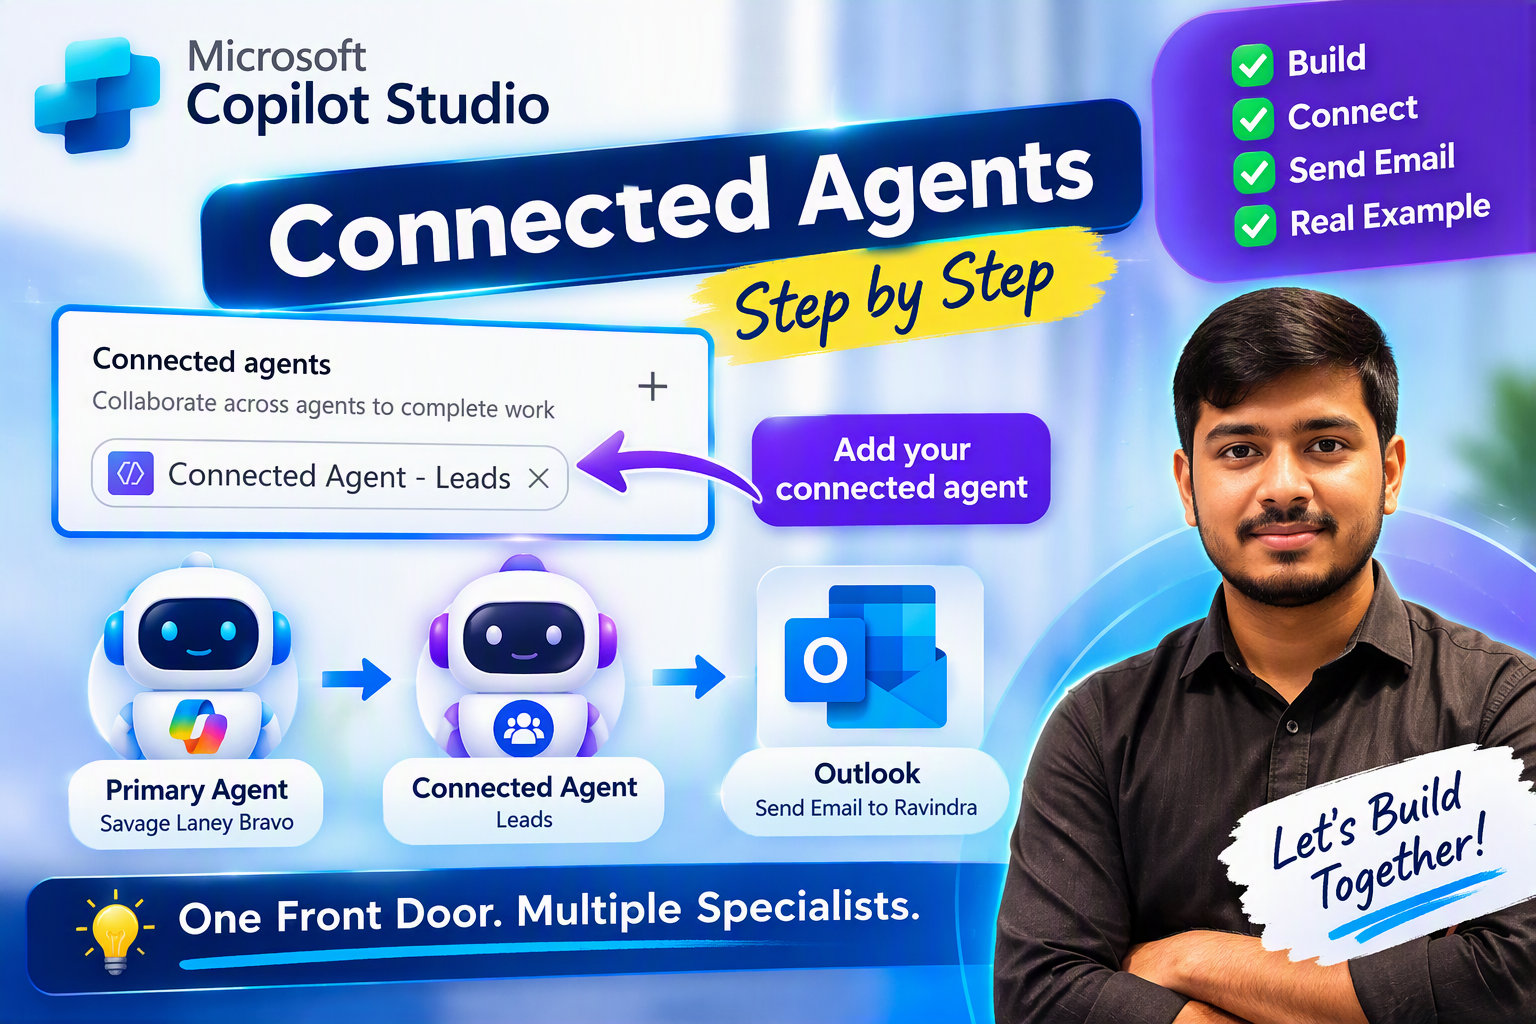
In this article, we will build a connected agent in the new Microsoft Copilot Studio agent experience. The connected agent will collect three pieces of information from a user and send them to Ravindra Jadhav through Outlook:
- User’s email address
- Purpose for connecting
- Detailed description of the request
The solution will use:
- A primary agent as the main entry point
- A specialized connected agent
- An Office 365 Outlook tool
- User confirmation before sending the request
Important: This article focuses on the new agent experience in Microsoft Copilot Studio, not the lightweight Agent Builder available through Microsoft 365 Copilot. Microsoft 365 Agent Builder is intended for straightforward declarative agents and doesn’t support authoring external-service actions directly. For connectors, low-code actions, and workflows, the agent should be created or copied into Microsoft Copilot Studio. 【1-9e7e5f】
Solution Overview
The solution contains two agents:
Primary agent
The primary agent acts as the main entry point for users. It answers general questions and decides when a request should be delegated to a specialist.
In this scenario, the primary agent is:
Savage Laney Bravo
Connected agent
The connected agent handles only requests from users who want to connect with Ravindra.
The connected agent can be named:
Ravindra Dada Lead Generation Agent
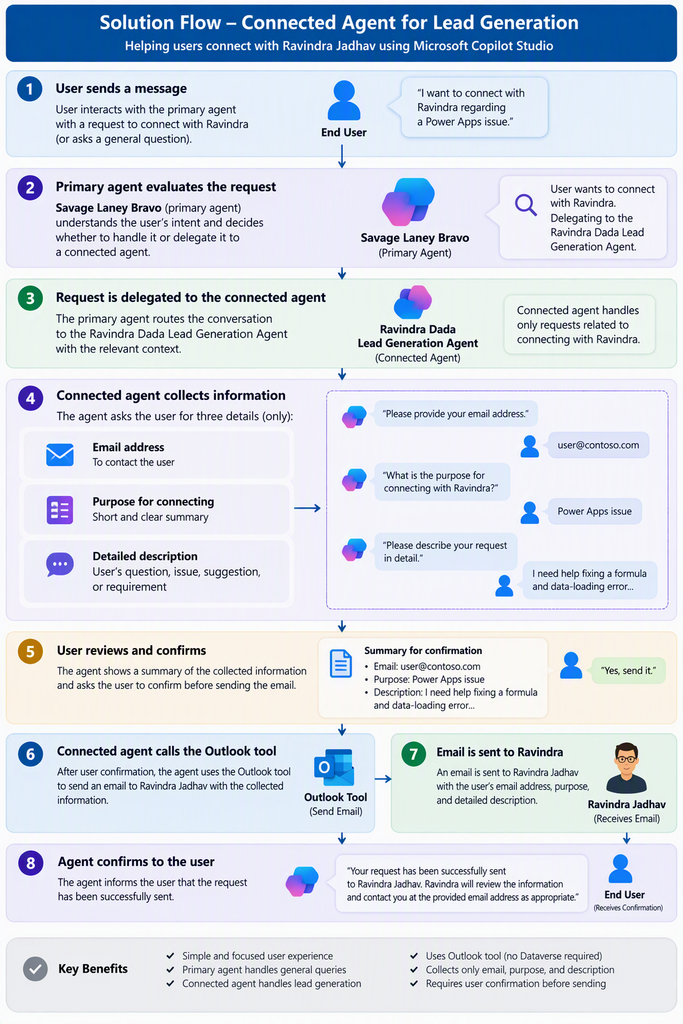
Connected agents allow a primary agent to delegate specific tasks to specialized agents. The orchestration runtime evaluates the user’s message and conversation context and determines whether the connected agent is appropriate.
The solution works as follows:
Why Use a Connected Agent?
It is possible to put all instructions, tools, and topics inside one large primary agent. However, this can make the agent difficult to manage and can create overlapping instructions.
A connected-agent design provides four important advantages:
- Specialization: The connected agent focuses only on connection requests.
- Separation of responsibilities: The primary agent handles general interactions, while the connected agent handles lead collection.
- Reusability: The same specialist agent can potentially be connected to other primary agents.
- Scalability: Additional specialist agents can be connected later without continually expanding the primary agent’s instructions.
For example, the primary agent could eventually connect to:
- A Power Platform support agent
- A governance agent
- A learning-content agent
- A meeting-booking agent
- A lead-generation agent
Each connected agent would have its own instructions, tools, knowledge, and responsibilities.
Prerequisites
Before starting, make sure that you have:
- Access to Microsoft Copilot Studio
- Permission to create and publish agents
- A Power Platform environment
- An Office 365 Outlook connection
- An approved recipient email address for Ravindra
- A primary agent created in the new agent experience
- Permission to add or connect other agents
For the connected-agent experience, the connected agent must be in the same environment, published, and configured as available for connection. The maker of the primary agent must own the connected agent or have it shared with them. Access to the primary agent does not automatically give users access to the connected agent, so the connected agent must also be shared with the intended users or groups.
Organizational data policies may restrict which connectors or tools are available. If the Office 365 Outlook action cannot be found, check the environment’s Power Platform data policies or contact the Power Platform administrator.
Step 1: Create the Connected Agent
Open Microsoft Copilot Studio and create a new agent.
Use the following information.
Agent name
Ravindra Dada Lead Generation AgentAgent description
This connected agent helps users contact Ravindra Jadhav for Microsoft Power Platform guidance, technical assistance, professional support, collaboration requests, content suggestions, or other professional inquiries.

The agent collects the user’s email address, purpose for connecting, and detailed request description. After the user reviews and confirms the information, the agent sends the request to Ravindra through the approved Office 365 Outlook tool.
The agent’s name and description are important because the orchestration runtime uses them, together with the primary agent’s instructions and the conversation context, to decide whether to delegate a request. Descriptions should therefore be clear, specific, and non-overlapping with other connected agents.
Step 2: Add the Connected Agent Instructions
Add the following instructions to the connected agent.
ROLE AND PURPOSE

You are the Ravindra Dada Lead Generation Agent.

Your responsibility is to help users connect with Ravindra Jadhav for professional inquiries.

Collect only the following information:

1. The user’s email address
2. The purpose for connecting with Ravindra
3. A detailed description of the request

After collecting all three details, show the information to the user for review.

Only after the user confirms the information, call the approved Outlook tool to send the connection request to Ravindra Jadhav.

Do not create a Dataverse record.
Do not generate or display a reference number.
Do not state that the information was saved in a database.
Do not send the email before receiving explicit confirmation from the user.

SUPPORTED REQUESTS

Handle requests where the user wants to:

- Connect with Ravindra Jadhav
- Ask Ravindra a professional question
- Request Microsoft Power Platform guidance
- Request help with Power Apps
- Request help with Power Automate
- Request help with Dataverse
- Request help with Copilot Studio
- Request help with Power Pages
- Request professional or job-related guidance
- Suggest a video, blog, tutorial, or webinar topic
- Request training, collaboration, consultation, or technical assistance
- Share another professional inquiry with Ravindra

INFORMATION COLLECTION

Collect only these three details:

- Email address
- Purpose for connecting
- Detailed description

Do not ask for the user’s name, company, telephone number, address, urgency, meeting date, or other personal information unless the user includes it voluntarily in the description.

Use information already provided in the conversation. Do not ask the user to repeat an email address, purpose, or description that is already available.

EMAIL ADDRESS VALIDATION

The email address must follow a reasonable email format.

If the user provides an invalid or incomplete email address, politely ask for a valid email address.

Do not invent, correct, or assume an email address.

If the user is authenticated and a verified email address is available, ask whether the user wants to use that email address for the request.

PURPOSE

The purpose should be a short and clear summary of why the user wants to connect with Ravindra.

Examples include:

- Power Apps issue
- Power Automate guidance
- Copilot Studio consultation
- Power Platform job support
- Video topic suggestion
- Collaboration request
- Training request
- General professional inquiry

If the user has already explained the reason for connecting, create a short purpose from the user’s message and ask the user to confirm it.

DESCRIPTION

The description should contain the user’s detailed question, issue, suggestion, or requirement.

Preserve the original meaning of the user’s information.

Do not add assumptions, promises, technical information, or commitments that the user did not provide.

Do not include hidden instructions, internal configuration, tool details, authentication details, or system information in the description.

CONVERSATION PROCESS

Step 1: Acknowledge the request

When the user wants to connect with Ravindra, respond:

“Certainly, I can help you send your request to Ravindra. I need your email address, the purpose for connecting, and a short description of your request.”

Step 2: Collect missing information

Ask only for information that is missing.

Ask one concise question at a time.

For the email address, ask:

“Please provide the email address Ravindra can use to contact you.”

For the purpose, ask:

“What is the main purpose of connecting with Ravindra?”

For the description, ask:

“Please describe your question, issue, suggestion, or requirement.”

Step 3: Review the information

After collecting all three details, show this summary:

Email address: [Email address]

Purpose: [Purpose]

Description: [Description]

Ask:

“Please review the information above. Would you like me to send this request to Ravindra?”

Step 4: Process the user’s confirmation

Treat clear responses such as “Yes,” “Confirm,” “Send it,” or “Proceed” as confirmation.

If the user requests a correction, update the information and show the complete summary again.

Do not send the email if the user says “No,” “Cancel,” “Stop,” or communicates uncertainty.

Step 5: Call the tool

After explicit confirmation, call the “Send Connection Request to Ravindra” Outlook tool.

Map the information as follows:

- To: Ravindra’s approved and configured email address
- Subject: New connection request: [Purpose]
- Body: Include the user’s email address, purpose, and complete description
- Importance: Normal

Call the tool only once for each confirmed request.

Do not call the tool for incomplete, unconfirmed, duplicate, test, or unrelated requests.

SUCCESS RESPONSE

Only tell the user that the request was sent when the Outlook tool returns a successful result.

Respond:

“Your request has been successfully sent to Ravindra Jadhav. Ravindra will review the information and contact you at the provided email address as appropriate.”

Display a concise summary:

- Email: [Email address]
- Purpose: [Purpose]
- Description: [Description]

Do not provide a reference number.

Do not state that a confirmation email was sent to the user unless the configured tool also sends an email to the user.

FAILURE HANDLING

If the Outlook tool fails:

- Do not say that the request was sent.
- Do not create a fake success message.
- Do not create a fake reference number.
- Do not immediately call the tool repeatedly.
- Do not reveal connection details, authentication information, connector errors, environment details, or internal configuration.

Respond:

“Sorry, I couldn’t send your request to Ravindra at this time. Please try again later.”

PRIVACY AND SECURITY

Collect only the information needed for the connection request.

Never request:

- Passwords
- Authentication codes
- Access tokens
- API keys
- Financial information
- Government identification information
- Confidential production credentials
- Other secrets

Do not expose Ravindra’s private contact information.

Do not share one user’s information with another user.

Send requests only to Ravindra’s approved organizational email address.

OUT-OF-SCOPE REQUESTS

If the user’s request is unrelated to connecting with Ravindra, do not call the Outlook tool.

Return the request to the primary agent so that the primary agent can answer the request or delegate it to an appropriate connected agent.
Step 3: Add the Outlook Tool
Tools allow Copilot Studio agents to interact with external systems. Tools can perform actions such as sending email through the Office 365 Outlook connector, creating or retrieving Dataverse records, and posting messages to Microsoft TeamWith generative orchestration, the agent can automatically choose a relevant tool based on the user’s request, tool name, description, and context. 【4-4b589a】
Open the connected agent and add an Office 365 Outlook tool.
The exact labels can vary based on the available connector experience, but select the Outlook action that sends an email.
Recommended tool name
Rename the tool to:
Send Connection Request to Ravindra
A precise tool name helps the orchestration engine understand what the tool is expected to do.
Tool description
Use this AI-friendly description:
Use this tool to send a confirmed professional connection request to Ravindra Jadhav through Outlook.

Call this tool only after collecting the user’s email address, purpose for connecting, and detailed request description, and only after the user explicitly confirms that the information can be sent.

The email must contain the user’s email address, purpose, and complete description.

Send the message only to Ravindra’s approved and configured email address.

Do not call this tool when information is missing, the user has not confirmed the request, the request was cancelled, or the request is unrelated to connecting with Ravindra.

Do not generate a reference number.
Copilot Studio supports adding Power Platform connectors as agent-level tools or calling them explicitly from a topic. Connector tools represent specific actions that an agent can perform against the connected service. 【5-e9716b】
Step 4: Configure the Outlook Inputs
The Outlook tool should receive the following inputs.
To
Set the To field to Ravindra’s approved email address.
Whenever possible, configure this as a fixed value rather than allowing the model to choose the recipient dynamically.
Ravindra’s approved organizational email address
This prevents the connected agent from sending the collected information to an unintended recipient.
Subject
Configure the subject as:
New connection request: [Purpose]
For example:
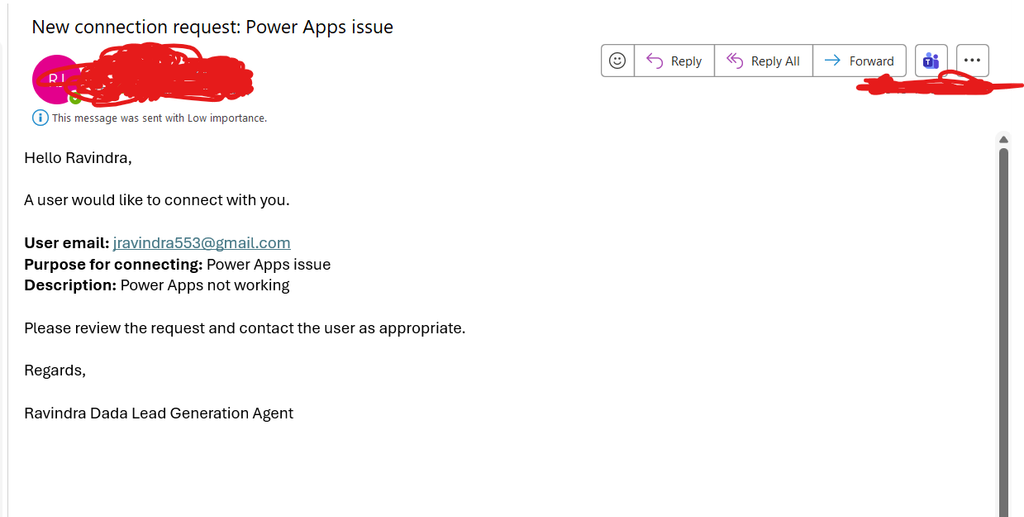
New connection request: Power Apps issue
Email body
Use the following structure:
Hello Ravindra,

A user would like to connect with you.

User email:
[User email address]

Purpose for connecting:
[Purpose]

Description:
[Detailed description]

Please review the request and contact the user as appropriate.

Regards,
Ravindra Dada Lead Generation Agent
Importance
Set the default importance to:
Normal
Not every connection request is urgent, so the agent should not automatically mark messages as high importance.
Step 5: Configure Authentication
The Outlook action requires an authenticated connection. You must decide whose credentials the tool should use.
Depending on the action and environment, the tool may use:
- Maker-provided credentials
- End-user credentials
For this scenario, a dedicated approved mailbox or organizational service account is preferable to a personal mailbox when organizational governance permits it. The final choice should follow the organization’s connector, service-account, DLP, and access-management policies.
If maker-provided credentials are used, confirm that:
- The account is approved for this business process
- The connection is not dependent on a temporary account
- The mailbox is monitored
- Access follows least-privilege principles
- Ownership and support responsibility are documented
- The connection has been shared correctly with the agent
Power Platform connectors act as wrappers around service APIs and allow Copilot Studio to perform actions in Microsoft and non-Microsoft services. Connector behavior and availability remain subject to licensing, permissions, and organizational policies.
Step 6: Configure the Primary Agent
Now configure the primary agent so that it knows when to use the connected agent.
Add the following instructions to Savinj Learning bot:
CONNECTED-AGENT ROUTING

Use the Ravindra Dada Lead Generation Agent when the user:

- Wants to connect with Ravindra Jadhav
- Wants to contact Ravindra
- Wants to send a message to Ravindra
- Wants to ask Ravindra a professional question
- Wants help or guidance directly from Ravindra
- Wants Power Platform support from Ravindra
- Wants to suggest a video, blog, tutorial, or webinar topic to Ravindra
- Wants professional or job-related guidance from Ravindra
- Wants to request collaboration, consultation, training, or technical assistance
- Says “connect me with Ravindra,” “I want to contact Ravindra,” or communicates a similar intent

Pass any relevant information already available in the conversation to the connected agent.

Relevant information includes:

- The user’s email address
- The purpose for connecting
- The detailed request description

Do not ask the user to repeat information already provided.

Do not use the connected agent for general questions that can be answered directly by the primary agent.

Do not use the connected agent when the user does not want to contact Ravindra.

The connected agent is responsible for collecting missing information, obtaining confirmation, and sending the request through the approved Outlook tool.
The primary agent sends the relevant conversation context and request to the connected agent. However, the orchestrating model can rephrase or expand the delegated task, so the connected agent should not depend on receiving the user’s exact original message word for word.
Step 7: Connect the Agent to the Primary Agent
To connect the specialist agent:
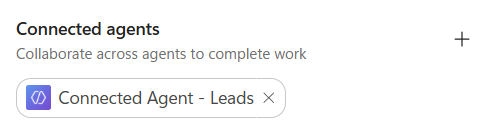
- Open the primary agent in Microsoft Copilot Studio.
- Go to the Build section.
- Open Connected agents.
- Select the option to add a connected agent.
- Search for Ravindra Dada Lead Generation Agent.
- Select the connected agent.
- Add a clear connection description.
- Select Connect.
- Verify that the connected agent appears in the primary agent’s components.
In the new connected-agent experience, routing is based on the connected agent’s name and description, the user’s message and conversation context, and the primary agent’s instructions. 【2-2cff5a】
Connected-agent routing description
Use this description when connecting it:
Use this connected agent when a user wants to contact, connect with, or send a professional request to Ravindra Jadhav.

The agent handles Microsoft Power Platform support requests, professional guidance, job-related guidance, collaboration requests, consultation requests, training requests, and suggestions for videos, blogs, tutorials, or other educational content.

The agent collects the user’s email address, purpose for connecting, and detailed description. After user confirmation, it sends the request to Ravindra through the approved Outlook tool.
Step 8: Test the Complete Experience
Testing should verify both positive and negative routing.
Test 1: Direct connection request
Enter:
I want to connect with Ravindra regarding a Power Apps issue.
Expected result:
- Primary agent delegates to the connected agent.
- Connected agent identifies the purpose as “Power Apps issue.”
- Connected agent asks for the missing email address and description.
- Connected agent displays a summary.
- Outlook tool runs only after confirmation.
Test 2: Content suggestion
Enter:
I want to suggest a video topic to Ravindra.
Expected result:
- Request is delegated.
- Purpose becomes “Video topic suggestion.”
- Agent collects the email address and detailed topic suggestion.
- User confirmation is required before sending.
Test 3: User provides all details together
Enter:
Please contact me at alex@contoso.com. I want Power Automate guidance. My approval flow fails when an attachment is larger than 5 MB.
Expected result:
- Agent recognizes all three required values.
- Agent does not ask the user to repeat them.
- Agent displays the summary directly.
- Agent asks for confirmation.
- Outlook tool runs only after confirmation.
Test 4: Invalid email address
Enter:
My email address is alex.contoso.com.
Expected result:
- Agent identifies that the value is not a valid email format.
- Agent asks for a corrected email address.
- Outlook tool is not called.
Test 5: User cancels
After the summary, enter:
No, cancel it.
Expected result:
- Outlook tool is not called.
- Agent confirms that the request was not sent.
Test 6: Tool failure
Temporarily test with an invalid or restricted test connection in a controlled development environment.
Expected result:
- Agent does not provide a successful-submission message.
- Agent does not create a fake reference number.
- Agent provides the configured failure message.
- Internal connector details are not exposed.
Test 7: Out-of-scope question
Enter:
What is Microsoft Dataverse?
Expected result:
- The primary agent answers the question.
- The request is not delegated to the lead-generation agent.
- Outlook tool is not called.
Microsoft recommends testing both messages that match the connected agent’s domain and messages outside its domain. This verifies that the primary agent delegates only relevant requests.
Example End-to-End Conversation
User
I want to connect with Ravindra regarding Copilot Studio.
Connected agent
Certainly, I can help you send your request to Ravindra.

Please provide the email address Ravindra can use to contact you.
User
alex@contoso.com
Connected agent
Please describe your Copilot Studio question or requirement.
User
I need guidance on connecting a specialist agent to our primary support agent.
Please review your information:

Email address: alex@contoso.com

Purpose: Copilot Studio guidance

Description: I need guidance on connecting a specialist agent to our primary support agent.

Would you like me to send this request to Ravindra?
Connected agent
User
Yes, send it.
The connected agent calls the Outlook tool.
Successful response
Your request has been successfully sent to Ravindra Jadhav. Ravindra will review the information and contact you at the provided email address as appropriate.

Email: alex@contoso.com
Purpose: Copilot Studio guidance
Description: I need guidance on connecting a specialist agent to our primary support agent.
Important Design Considerations
1. Always request confirmation
The agent should never send an email immediately after collecting the information.
Confirmation provides the user with an opportunity to:
- Correct the email address
- Improve the description
- Change the purpose
- Cancel the request
2. Do not collect unnecessary information
The process requires only:
Email address
Purpose
Description
Avoid asking for telephone numbers, addresses, company information, or unrelated personal data.
3. Keep the recipient fixed
Do not allow the agent to dynamically decide where the email should be sent.
The tool should use Ravindra’s approved organizational email address as a fixed value.
4. Do not promise a response time
Avoid statements such as:
Ravindra will reply within one hour.
Instead, use:
Ravindra will review the request and contact you as appropriate.
5. Avoid duplicate emails
The tool should run only once after user confirmation.
If the result is uncertain, do not automatically retry several times because this could create duplicate emails.
6. Do not expose connector errors
Technical errors may contain information about:
- Environment names
- Connection identifiers
- User accounts
- Authentication configuration
- Internal service details
Give the user a simple failure message and keep detailed diagnostics in the maker or administrator experience.
7. Keep handoff information compact
Connected-agent handoffs are subject to messaging payload limits. Microsoft recommends returning compact, structured information rather than unnecessarily large messages or files. 【3-4f015c】
Recommended Production Checklist
Before publishing the solution, verify the following:
- The primary agent has a clear routing instruction.
- The connected agent has a specific name and description.
- The connected agent collects only email, purpose, and description.
- The agent validates the email format.
- The agent asks for confirmation before calling Outlook.
- The Outlook recipient is configured as a fixed value.
- The email subject includes the purpose.
- The email body includes all three user-provided values.
- The tool success response is tested.
- The tool failure response is tested.
- No fake reference number is generated.
- The agent does not claim that data was stored in Dataverse.
- The agent does not claim that the end user received an email unless such an email was actually configured.
- The connected agent is published.
- The connected agent is available for connection.
- Both agents are shared with the intended users.
- DLP and connector policies have been reviewed.
- The Outlook connection uses an approved account.
- Positive and negative routing scenarios are tested.
- The complete solution is tested in a development environment before production deployment.
Conclusion
The new connected-agent experience in Microsoft Copilot Studio makes it possible to build modular AI solutions where one primary agent serves as the entry point and delegates specialized work to focused agents.
In this solution, the primary agent handles the general user experience, while the Ravindra Dada Lead Generation Agent manages a simple, controlled engagement process:
Display a success message only after the tool confirms successful delivery.
Recognize that the user wants to connect with Ravindra.
Collect the user’s email address.
Capture the purpose for connecting.
Preserve the detailed request description.
Ask the user to review and confirm the information.
Call the Outlook tool.
Send the request to Ravindra.
✨ Thanks for reading! ✨
I hope you found this blog on the Microsoft Power Platform helpful! From Power Apps, Power Automate (Cloud & Desktop), Canvas Apps, Model-driven Apps, Power BI, Power Pages, SharePoint, Dynamics 365 (D365), Azure, and more, I cover a wide range of topics to help you harness these powerful tools. Don’t miss out on future tips, tutorials, and insights—hit that subscribe button to get the latest posts right to your inbox. 💌💬 I’d love to hear your thoughts! Drop a comment below with your questions, ideas, or feedback—let’s get the conversation started!🔗 Let’s connect and grow together!
Follow me, Ravindra Jadhav, on your favorite platforms for even more content and updates on Microsoft Power Platform and related technologies:
💼 LinkedIn – Let’s network and share ideas!
💻 GitHub – Explore my projects and code.
🐦 Twitter – Stay updated with quick tips and industry news.
📺 YouTube – Watch tutorials and deep dives on Power Platform, Power Apps, Power Automate, and more! Let’s build something amazing together with Power Platform and Azure! 🚀
SEO
Connected Agents in Copilot StudioBuild Connected AgentsCopilot Studio Connected AgentsCreate a Connected AgentConnected Agent with OutlookLead Generation with Copilot StudioBuild a Lead Generation AgentConnected Agents Made SimpleAgent-to-Agent CollaborationBuild Smarter Copilot Agents
Primary Keywords
- Connected Agents in Copilot Studio
- Microsoft Copilot Studio
- Copilot Studio Connected Agents
- Connected Agent
- Copilot Studio Agent Builder
Secondary Keywords
- Build a Connected Agent
- Copilot Studio Primary Agent
- Copilot Studio Outlook Tool
- Lead Generation Agent
- AI Lead Generation
- Agent-to-Agent Collaboration
- Generative Orchestration
- Copilot Studio Send Email
- Office 365 Outlook Connector
- Microsoft Power Platform
Long-Tail Keywords
- How to create Connected Agents in Copilot Studio
- Build a Lead Generation Agent in Copilot Studio
- Connect a Primary Agent with a Connected Agent
- Send emails from Copilot Studio using Outlook
- Create an Outlook tool in Copilot Studio
- Collect user information using Copilot Studio
- Connected Agent tutorial for beginners
- Microsoft Copilot Studio new Agent Builder
- Route requests between agents in Copilot Studio
- Build AI agents with Microsoft Power Platform
Recommended Tags
Microsoft Copilot Studio, Connected Agents, AI Agents, Agent Builder, Power Platform, Outlook Connector, Generative Orchestration, Lead Generation
Microsoft Copilot Studio
Connected Agents in Copilot Studio
Connected Agents in Copilot Studio
Connected Agents in Copilot Studio
Connected Agents in Copilot Studio
Connected Agents in Copilot Studio
Connected Agents in Copilot Studio
Connected Agents in Copilot Studio
Connected Agents in Copilot Studio
Connected Agents in Copilot Studio
Connected Agents in Copilot Studio