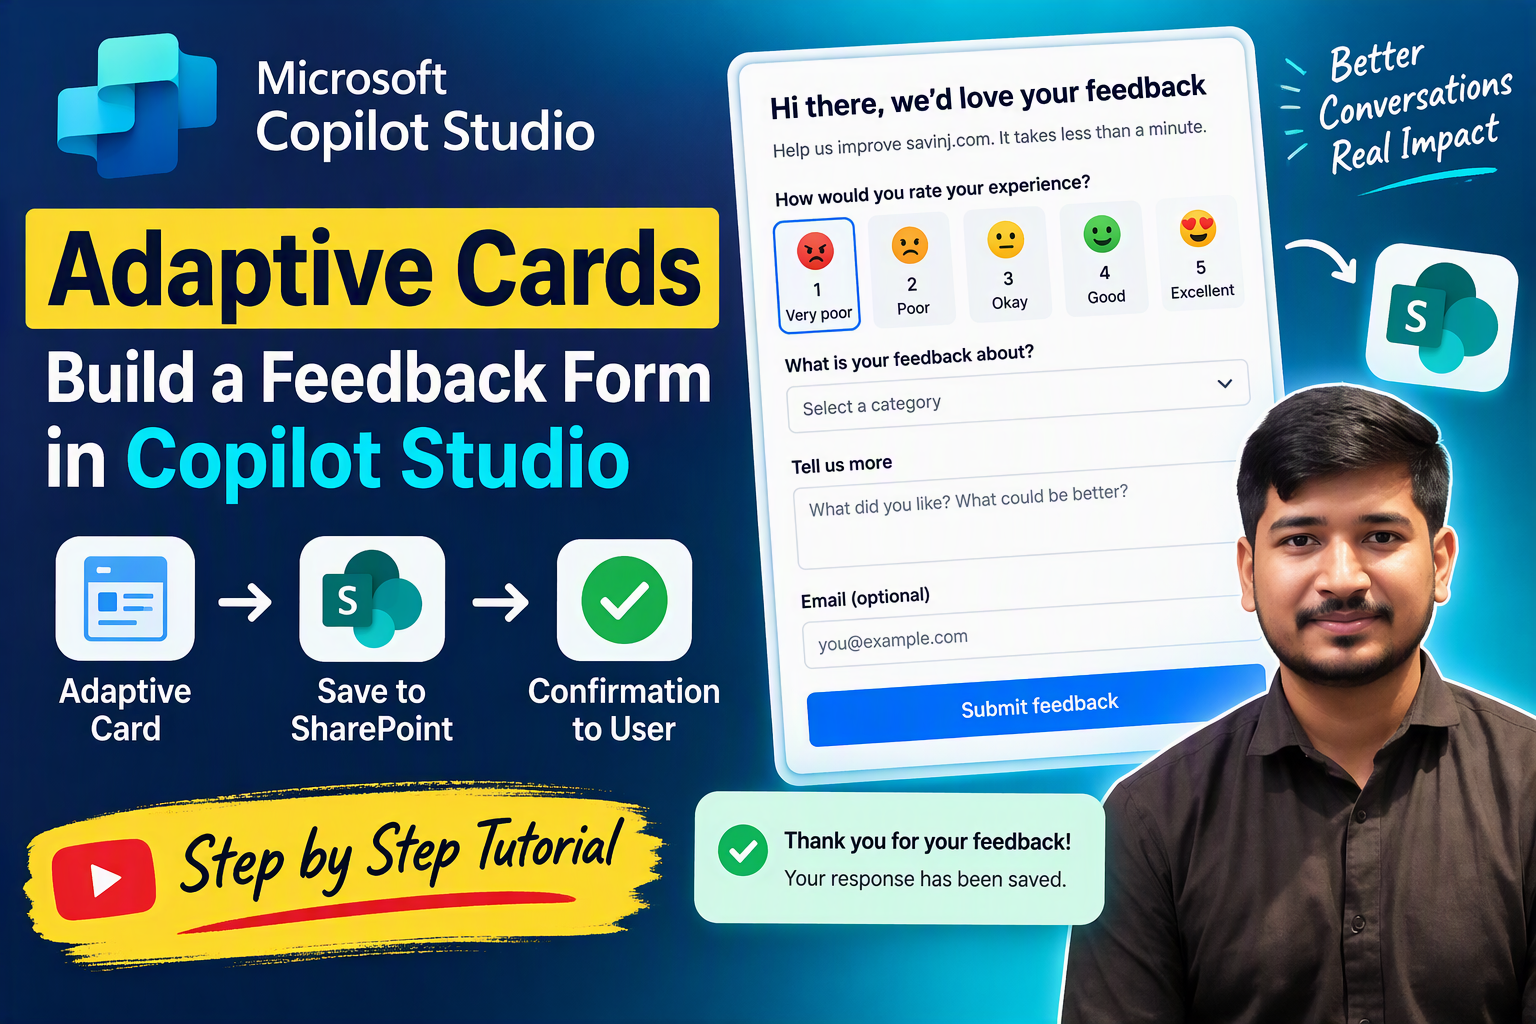
Adaptive Cards are an excellent way to create interactive and visually engaging experiences inside a Copilot Studio agent. Instead of asking users multiple questions one at a time, you can display a single feedback form containing ratings, categories, comments, and contact information.
In this tutorial, we will build a feedback collection experience in Adaptive Cards in Microsoft Copilot Studio :
- Triggers a Feedback topic
- Displays an interactive Adaptive Card
- Personalizes the card using the user’s display name
- Uses Power Fx to generate dynamic choices
- Captures the submitted responses in topic variables
- Saves the feedback to a SharePoint list
- Displays a confirmation message to the user
Adaptive Cards are platform-independent UI components defined using a JSON-based schema. In Copilot Studio, an interactive Adaptive Card can contain input fields and submit buttons, and the submitted values are automatically stored in variables that can be used later in the conversation.
Solution Overview
The overall feedback collection process works as follows:
- The user enters a feedback-related phrase.
- The Feedback topic is triggered.
- Copilot Studio displays an Adaptive Card.
- The user selects a rating and feedback category.
- The user optionally enters comments and an email address.
- The user selects Submit feedback.
- Copilot Studio stores the submitted values in topic variables.
- The SharePoint connector creates a new list item.
- The agent displays a confirmation message.
User
  ↓
Feedback Topic
  ↓
Ask with Adaptive Card
  ↓
Capture rating, category, comments, and email
  ↓
SharePoint Create item action
  ↓
Display confirmation message
Prerequisites
Before creating the solution, make sure you have:
- Access to Microsoft Copilot Studio
- Permission to create and edit an agent
- A SharePoint site
- Permission to create or update a SharePoint list
- A SharePoint connection configured in your environment
- Basic knowledge of Copilot Studio topics and variables
The SharePoint connector is available as a standard connector in Copilot Studio. It can be used to work with SharePoint sites, documents, and list items.
Step 1: Create the SharePoint Feedback List
First, create a SharePoint list where the submitted feedback will be stored.
For this example, create a list named:
FeedbackAdd the following columns.
| Column name | Column type | Purpose |
|---|---|---|
| Title | Single line of text | Short description or feedback reference |
| Rating | Single line of text or Number | User-selected rating |
| Category | Single line of text or Choice | Feedback category |
| Comments | Multiple lines of text | Detailed feedback |
| Single line of text | Optional user email | |
| UserName | Single line of text | User’s display name |
| SubmittedOn | Date and time | Feedback submission date |
You can also use the automatically generated Created column instead of creating a separate SubmittedOn column.
Recommended configuration
For the Rating column, use a Number column if you want to create reports or calculate average ratings later.
For the Category column, you can use either:
- A Single line of text column, or
- A Choice column containing the same category values used in the Adaptive Card
Step 2: Create the Feedback Topic
Open your agent in Microsoft Copilot Studio and create a new topic.
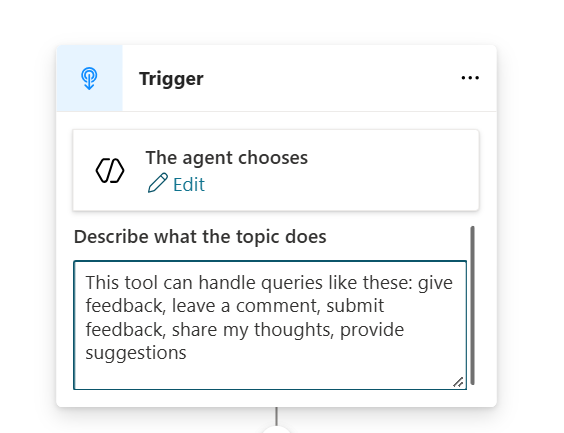
FeedbackAdd trigger phrases such as:
I want to give feedback
Give feedback
Submit feedback
Share my feedback
I have a suggestion
I found an issue
Report a problem
Website feedback
These phrases help the agent identify when the user wants to submit feedback.
If you already created the Feedback topic in an earlier solution or video, you can continue using the same topic.
Step 3: Add an Adaptive Card Node
Inside the Feedback topic:
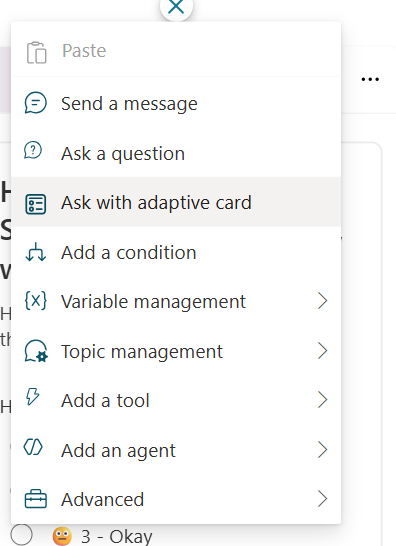
- Select the Add node button.
- Select Ask with Adaptive Card.
- Open the Adaptive Card node properties.
- Select Edit adaptive card.
- Switch to the Formula view if you want to use Power Fx.
- Replace the default card with the formula provided below.
Copilot Studio includes a built-in Adaptive Card designer. You can design the card visually or edit its payload directly. Interactive cards must include at least one submit action so the user can submit information back to the agent.
Although you can manually write the entire payload, using the Adaptive Cards Designer is highly recommended. It provides a visual preview and helps you identify schema, property, and layout problems before using the card in Copilot Studio.
Step 4: Add the Adaptive Card Power Fx Formula
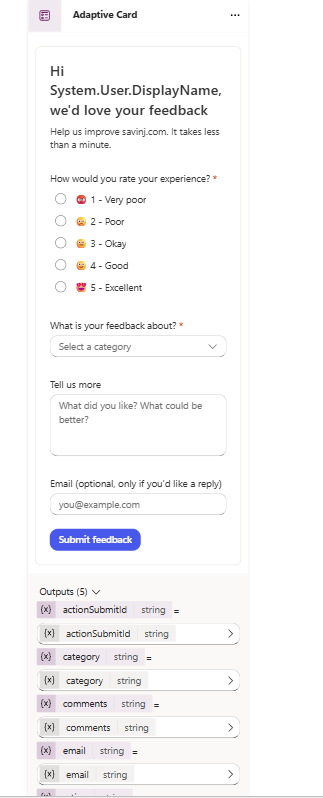
The following Adaptive Card collects:
- Experience rating
- Feedback category
- Detailed comments
- Optional email address
It also uses the logged-in user’s display name to personalize the heading.
{
    type: "AdaptiveCard",
    '$schema': "https://adaptivecards.io/schemas/adaptive-card.json",
    version: "1.5",
    body: [
        {
            type: "TextBlock",
            text: If(
                IsBlank(System.User.DisplayName),
                "We'd love your feedback",
                "Hi " & System.User.DisplayName & ", we'd love your feedback"
            ),
            weight: "Bolder",
            size: "Large",
            wrap: true
        },
        {
            type: "TextBlock",
            text: "Help us improve savinj.com. It takes less than a minute.",
            isSubtle: true,
            wrap: true,
            spacing: "Small"
        },
        {
            type: "Input.ChoiceSet",
            id: "rating",
            label: "How would you rate your experience?",
            style: "expanded",
            isRequired: true,
            errorMessage: "Please select a rating",
            spacing: "Medium",
            choices: [
                {
                    title: "😡 1 - Very poor",
                    value: "1"
                },
                {
                    title: "🙁 2 - Poor",
                    value: "2"
                },
                {
                    title: "😐 3 - Okay",
                    value: "3"
                },
                {
                    title: "🙂 4 - Good",
                    value: "4"
                },
                {
                    title: "😍 5 - Excellent",
                    value: "5"
                }
            ]
        },
        {
            type: "Input.ChoiceSet",
            id: "category",
            label: "What is your feedback about?",
            placeholder: "Select a category",
            isRequired: true,
            errorMessage: "Please choose a category",
            spacing: "Medium",
            choices: ForAll(
                Table(
                    {
                        t: "Content",
                        v: "Content"
                    },
                    {
                        t: "Design / Look and feel",
                        v: "Design"
                    },
                    {
                        t: "Navigation / Ease of use",
                        v: "Navigation"
                    },
                    {
                        t: "Performance / Speed",
                        v: "Performance"
                    },
                    {
                        t: "Bug or issue",
                        v: "Bug"
                    },
                    {
                        t: "Suggestion / New idea",
                        v: "Suggestion"
                    },
                    {
                        t: "Other",
                        v: "Other"
                    }
                ),
                {
                    title: ThisRecord.t,
                    value: ThisRecord.v
                }
            )
        },
        {
            type: "Input.Text",
            id: "comments",
            label: "Tell us more",
            placeholder: "What did you like? What could be better?",
            isMultiline: true,
            maxLength: 1000,
            spacing: "Medium"
        },
        {
            type: "Input.Text",
            id: "email",
            label: "Email (optional, only if you'd like a reply)",
            style: "Email",
            placeholder: "you@example.com",
            spacing: "Medium"
        }
    ],
    actions: [
        {
            type: "Action.Submit",
            title: "Submit feedback",
            style: "positive",
            data: {
                actionSubmitId: "savinj_feedback_submit"
            }
        }
    ]
}
Important: This is a Power Fx formula representation of an Adaptive Card, not standard JSON. Functions such as
If,IsBlank,ForAll, andTableare evaluated by Power Fx.
Copilot Studio allows Power Fx formulas to reference system and topic variables. System variables use the System. prefix, while values generated by the card are generally available through the Topic. scope. [learn.microsoft.com]
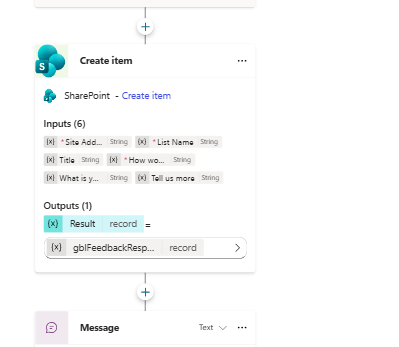
Step 6: Add the SharePoint Create Item Action
After the Adaptive Card node, add a SharePoint action.
- Select the Add node button.
- Select Add a tool or Call an action.
- Search for SharePoint.
- Select the Create item action.
- Select or create the required SharePoint connection.
- Select your SharePoint site.
- Select the Website Feedback list.
- Map the Adaptive Card variables to the SharePoint columns.
Power Platform connectors can be used as tools within a Copilot Studio topic. These connectors allow an agent to communicate with external services and carry out operations such as reading or writing records. [learn.microsoft.com]
Use the following mapping.
| SharePoint column | Value |
|---|---|
| Title | Feedback - and the selected category |
| Rating | Topic.rating |
| Category | Topic.category |
| Comments | Topic.comments |
Topic.email | |
| UserName | System.User.DisplayName |
| SubmittedOn | Current date and time |
For Title, you can use the following Power Fx formula:
Step 7: Display a Confirmation Message
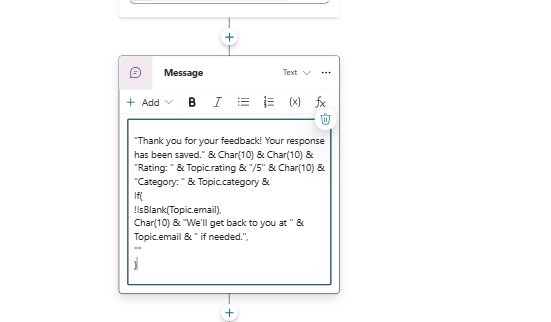
After successfully creating the SharePoint item, add a Send a message node.
Change the message to a Power Fx formula and use:
"Thank you for your feedback! Your response has been saved." &
Char(10) &
Char(10) &
"Rating: " & Topic.rating & "/5" &
Char(10) &
"Category: " & Topic.category &
If(
    !IsBlank(Topic.email),
    Char(10) &
    "We'll get back to you at " & Topic.email & " if needed.",
    ""
)
Conclusion
Using Adaptive Cards in Microsoft Copilot Studio provides a much better user experience than asking users multiple feedback questions individually.
In this solution, we created an interactive feedback form, personalized it using System.User.DisplayName, generated category choices using Power Fx, captured the user’s responses in topic variables, saved the information to SharePoint, and displayed a dynamic confirmation message.
This same pattern can be extended to create:
- Customer satisfaction surveys
- Employee feedback forms
- Support ticket forms
- Product review forms
- Event registration forms
- Leave requests
- IT service requests
- Website issue reporting forms
By combining Adaptive Cards, Power Fx, Copilot Studio topics, and SharePoint actions, you can build structured and user-friendly data collection experiences without developing a separate application
✨ Thanks for reading! ✨
I hope you found this blog on the Microsoft Power Platform helpful! From Power Apps, Power Automate (Cloud & Desktop), Canvas Apps, Model-driven Apps, Power BI, Power Pages, SharePoint, Dynamics 365 (D365), Azure, and more, I cover a wide range of topics to help you harness these powerful tools. Don’t miss out on future tips, tutorials, and insights—hit that subscribe button to get the latest posts right to your inbox. 💌💬 I’d love to hear your thoughts! Drop a comment below with your questions, ideas, or feedback—let’s get the conversation started!🔗 Let’s connect and grow together!
Follow me, Ravindra Jadhav, on your favorite platforms for even more content and updates on Microsoft Power Platform and related technologies:
💼 LinkedIn – Let’s network and share ideas!
💻 GitHub – Explore my projects and code.
🐦 Twitter – Stay updated with quick tips and industry news.
📺 YouTube – Watch tutorials and deep dives on Power Platform, Power Apps, Power Automate, and more! Let’s build something amazing together with Power Platform and Azure! 🚀
SEO
Copilot Studio Adaptive Cards, Adaptive Cards in Copilot Studio, Microsoft Copilot Studio tutorial, Copilot Studio feedback form, save Copilot Studio data to SharePoint, Ask with Adaptive Card, Copilot Studio Power Fx
how to use adaptive cards in copilot studio, how to create feedback form in copilot studio, save adaptive card response to sharepoint, copilot studio adaptive card power fx, create dynamic adaptive card in copilot studio, ask with adaptive card copilot studio, collect user feedback in copilot studio, sharepoint connector in copilot studio, copilot studio create item sharepoint, adaptive card feedback form tutorial, copilot studio adaptive card variables, interactive forms in copilot studio, power fx adaptive cards tutorial
copilot studio, microsoft copilot studio, copilot studio tutorial, adaptive cards, adaptive cards tutorial, copilot studio adaptive cards, ask with adaptive card, adaptive card power fx, power fx, sharepoint, sharepoint list, copilot studio sharepoint, copilot studio feedback form, feedback form, collect user feedback, save feedback to sharepoint, adaptive card json, adaptive card designer, microsoft power platform, power platform tutorial, copilot studio variables, copilot studio topics, create item sharepoint, AI agent, custom copilot, conversational AI, low code development, citizen developer, copilot studio for beginners, microsoft copilot
#CopilotStudio #AdaptiveCards #MicrosoftCopilot #PowerPlatform #PowerFx #SharePoint #AI agents #LowCode #Microsoft365 #PowerPlatformTutorial #CitizenDeveloper #ConversationalAI
Adaptive Cards in Copilot Studio
Copilot Studio Adaptive Card tutorial
Copilot Studio feedback form
Ask with Adaptive Card Copilot Studio
Copilot Studio Power Fx
Save Copilot Studio response to SharePoint
Copilot Studio SharePoint integration
Adaptive Card Power Fx formula
Create interactive form in Copilot Studio
Copilot Studio feedback collection
Adaptive Cards in Microsoft Copilot Studio
Adaptive Cards in Microsoft Copilot Studio
Adaptive Cards in Microsoft Copilot Studio
Adaptive Cards in Microsoft Copilot Studio
Adaptive Cards in Microsoft Copilot Studio
Adaptive Cards in Microsoft Copilot Studio
Adaptive Cards in Microsoft Copilot Studio
Adaptive Cards in Microsoft Copilot Studio
Adaptive Cards in Microsoft Copilot Studio
Adaptive Cards in Microsoft Copilot Studio
Adaptive Cards in Microsoft Copilot Studio
Adaptive Cards in Microsoft Copilot Studio
Adaptive Cards in Microsoft Copilot Studio
Adaptive Cards in Microsoft Copilot Studio
Adaptive Cards in Microsoft Copilot Studio