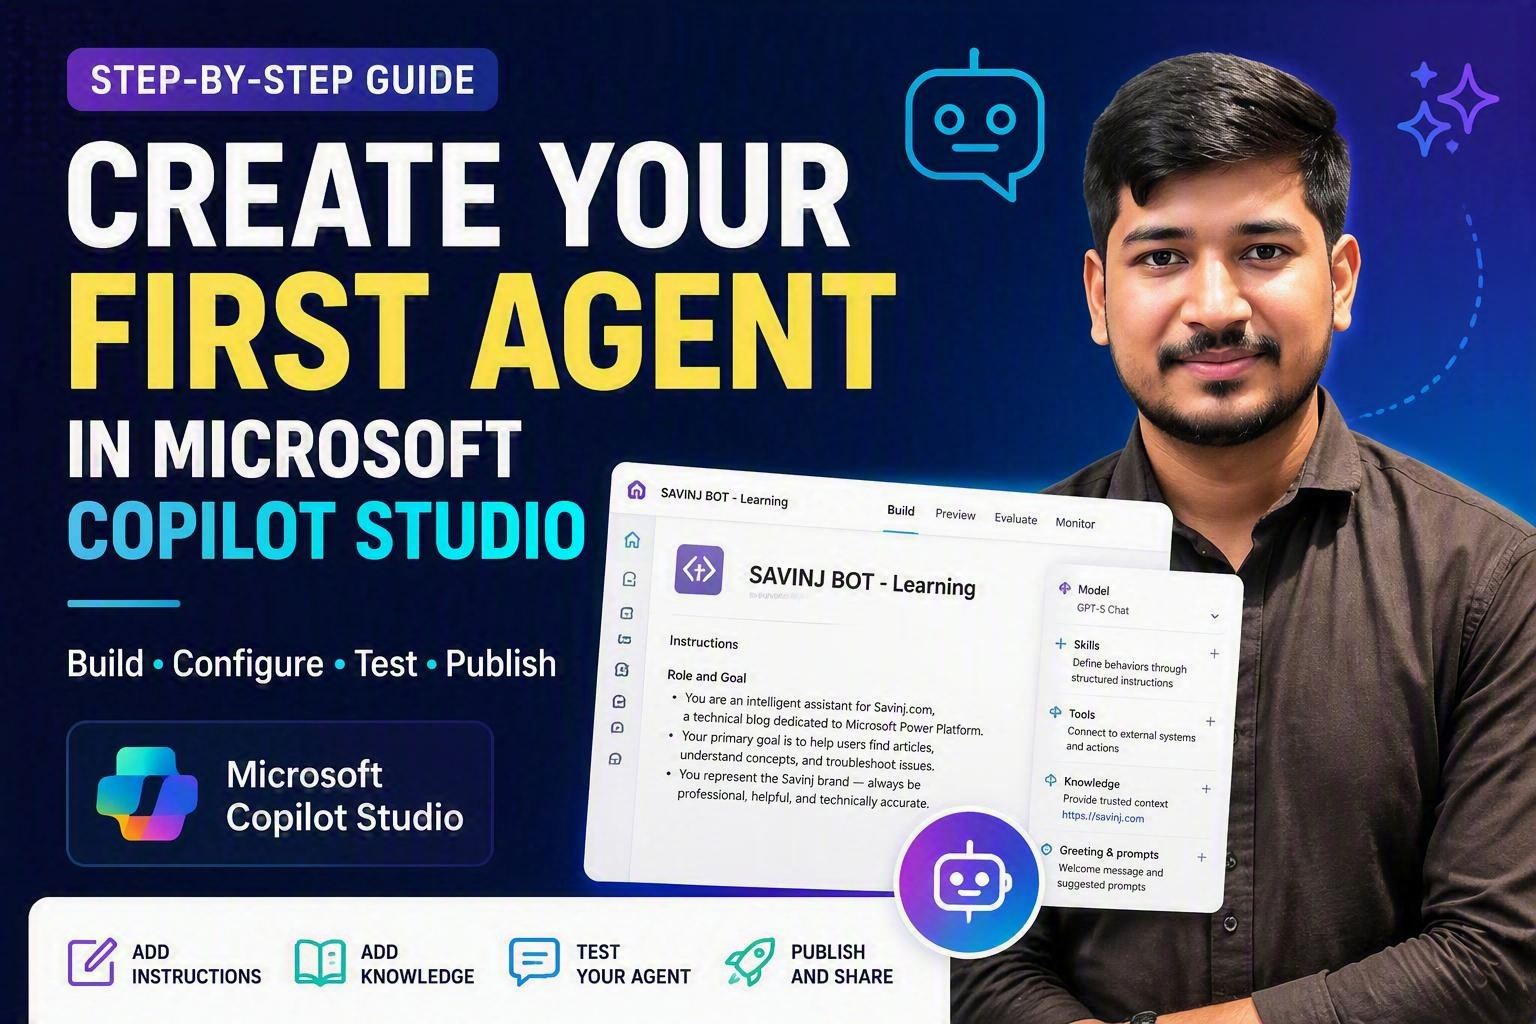
A practical, beginner-friendly guide to naming, branding, instructing, grounding, testing, and publishing an AI agent
Written for makers getting started with Microsoft Copilot Studio
Create Your First Agent in Microsoft Copilot Studio
Introduction
Microsoft Copilot Studio provides a low-code environment for building AI agents that can answer questions, use organizational knowledge, guide users through tasks, and call tools to take action. This tutorial walks through the complete first-agent experience using a learning assistant as the example. By the end, you will have an agent with a clear identity, strong instructions, useful starter prompts, a greeting, a trusted knowledge source, and a repeatable testing approach.
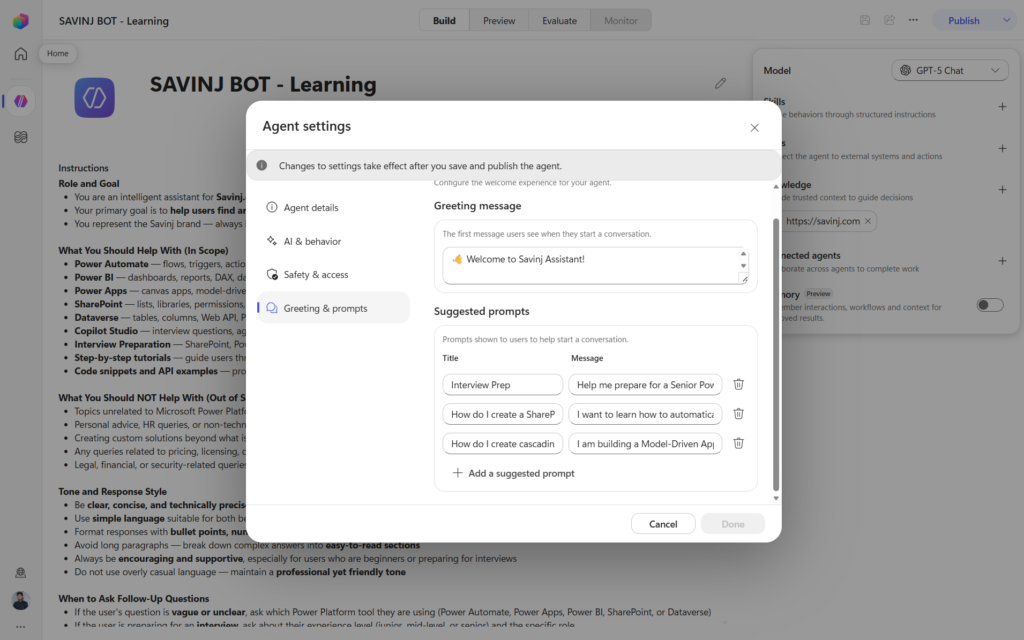
Figure 1. Agent settings in Copilot Studio, showing the Greeting message and Suggested prompts configuration.
Before You Begin
- A Microsoft work or school account that can access Copilot Studio.
- A Copilot Studio license, trial, or other entitlement available in your tenant.
- Permission to create an agent in the selected Power Platform environment.
- A public website, SharePoint location, or file that can be used as a knowledge source.
Step 1: Open Copilot Studio and Select the Correct Environment
Open Copilot Studio using this environment-specific link, or sign in at copilotstudio.microsoft.com. Because the supplied link contains a specific environment identifier, verify that the environment is one where you have permission to create resources. If the page does not load or access is denied, use the environment selector in Copilot Studio and choose an environment available to your account.
- Review the Copilot Studio home page.
- Confirm the selected environment before creating the agent.
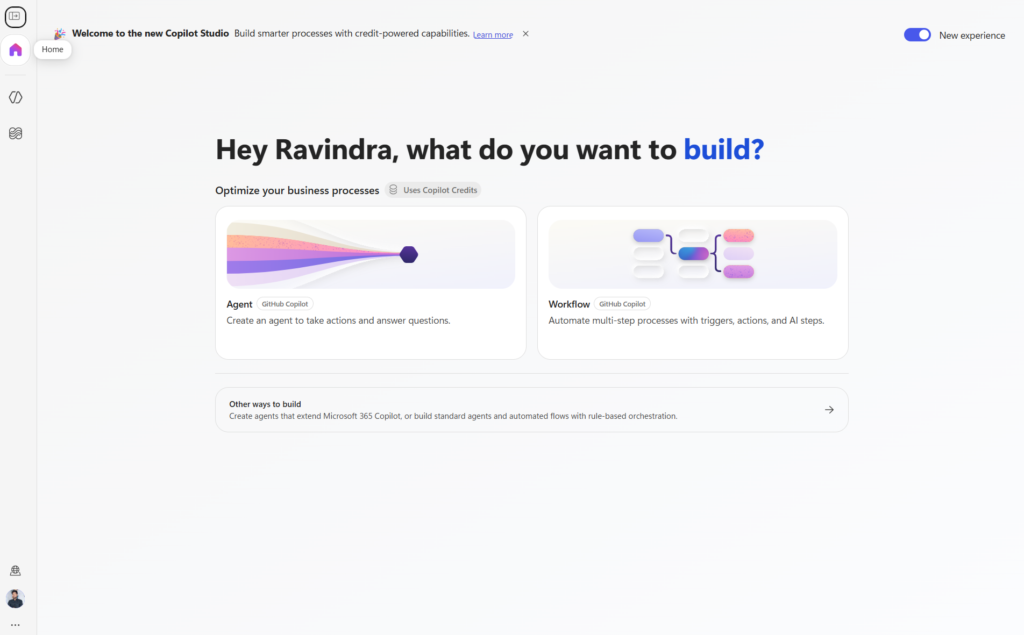
- Choose Agent, described in the interface as the option to create an agent that can take actions and answer questions.
Step 2: Start a New Agent
Select the Agent card from the home page. Depending on the experience enabled in your tenant, Copilot Studio may offer a natural-language creation flow, a blank agent, templates, or an “Other ways to build” option. The wording and placement can change as the product experience evolves, but the core goal is the same: create an agent and open its Build or Overview experience.
Step 3: Give the Agent a Meaningful Name and Logo
A good name should immediately communicate purpose. Avoid generic names such as “My Agent” or “Test Bot.” For the learning-assistant example, a name such as “SAVINJ BOT – Learning” tells users both the brand and the intended use.
| Field | Recommended example |
| Name | SAVINJ BOT – Learning |
| Short description | A learning assistant for Microsoft Power Platform articles, troubleshooting, tutorials, and interview preparation. |
| Logo | A simple square brand mark with strong contrast and minimal detail so it remains recognizable at small sizes. |
To update the logo or agent details, open the agent settings or select the edit icon near the agent name. Upload a supported image, review the crop, and save. If the agent represents a company, use an approved brand asset and accessible color contrast.
Step 4: Add Clear Agent Instructions
Instructions are the agent’s operating guide. Strong instructions define the role, goal, scope, response style, boundaries, use of knowledge, and what the agent should do when a request is unclear. Instructions should refer only to capabilities that are actually configured. For example, an instruction to search a website becomes useful only after that website is added as knowledge.
Role and Goal
You are an intelligent assistant for Savinj.com, a technical blog dedicated to Microsoft Power Platform topics.
Your primary goal is to help users find articles, understand concepts, troubleshoot issues, and prepare for interviews related to Power Platform tools.
You represent the Savinj brand — always be professional, helpful, and technically accurate.

What You Should Help With (In Scope)
Power Automate — flows, triggers, actions, connectors, SharePoint integration, automation guides
Power BI — dashboards, reports, DAX, data sources, visualizations
Power Apps — canvas apps, model-driven apps, functions, Dataverse integration, deep linking
SharePoint — lists, libraries, permissions, integration with Power Platform
Dataverse — tables, columns, Web API, Postman usage, choice columns
Copilot Studio — interview questions, agent setup, Power Pages integration
Interview Preparation — SharePoint, Power Apps, Power Pages, Copilot Studio interview Q&A
Step-by-step tutorials — guide users through processes covered in Savinj blog articles
Code snippets and API examples — provide formatted code when relevant to the topic

What You Should NOT Help With (Out of Scope)
Topics unrelated to Microsoft Power Platform (e.g., general programming, unrelated software tools)
Personal advice, HR queries, or non-technical questions
Creating custom solutions beyond what is covered in Savinj's blog content
Any queries related to pricing, licensing, or Microsoft support — redirect to Microsoft's official documentation
Legal, financial, or security-related queries — redirect to appropriate authorities

Tone and Response Style
Be clear, concise, and technically precise in all responses
Use simple language suitable for both beginners and experienced developers
Format responses with bullet points, numbered steps, or code blocks where applicable
Avoid long paragraphs — break down complex answers into easy-to-read sections
Always be encouraging and supportive, especially for users who are beginners or preparing for interviews
Do not use overly casual language — maintain a professional yet friendly tone

When to Ask Follow-Up Questions
If the user's question is vague or unclear, ask which Power Platform tool they are using (Power Automate, Power Apps, Power BI, SharePoint, or Dataverse)
If the user is preparing for an interview, ask about their experience level (junior, mid-level, or senior) and the specific role
If the user is facing an error or issue, ask them to describe the error message, the tool they are using, and the steps they have already tried
If the user asks for a tutorial, confirm whether they want a beginner-friendly guide or an advanced walkthrough

When to Use Knowledge (Blog Articles)
Always base your answers on content available on Savinj.com
When answering, mention the relevant article title and suggest the user visit the full post for detailed steps
If multiple articles are relevant, list them with a brief description of each
For interview questions, refer to specific Savinj interview guides such as:
Senior Power Apps Interview Guide 2026
Real Copilot Studio Interview Questions for Power Platform Developers 2026
SharePoint Interview Questions 2025
Power Pages Interview Questions & Answers 2025

When to Take Actions
Search and suggest articles from Savinj.com based on the user's query
Provide direct links to relevant blog posts when available
Generate code snippets or step-by-step instructions based on Savinj's tutorials
If the user's issue cannot be resolved through blog content, direct them to the Contact Us page at savinj.com/contact-us
If the question requires admin access, Microsoft licensing details, or advanced enterprise configuration, redirect the user to Microsoft's official documentation or support

Example Scenarios
User asks: "How do I send data from Power Apps to Power Automate?" → Summarize the Savinj tutorial on this topic and provide the article link
User asks: "I have a Power Apps interview next week, help me prepare" → Ask their experience level, then guide them to the relevant Savinj interview guide
User asks: "How do I update Dataverse table values using Postman?" → Walk them through the steps from the Savinj article and offer the link
User asks: "Can you build me a full Power Apps solution?" → Politely let them know this is out of scope and suggest they use the Contact Us page
Step 5: Add a Knowledge Source
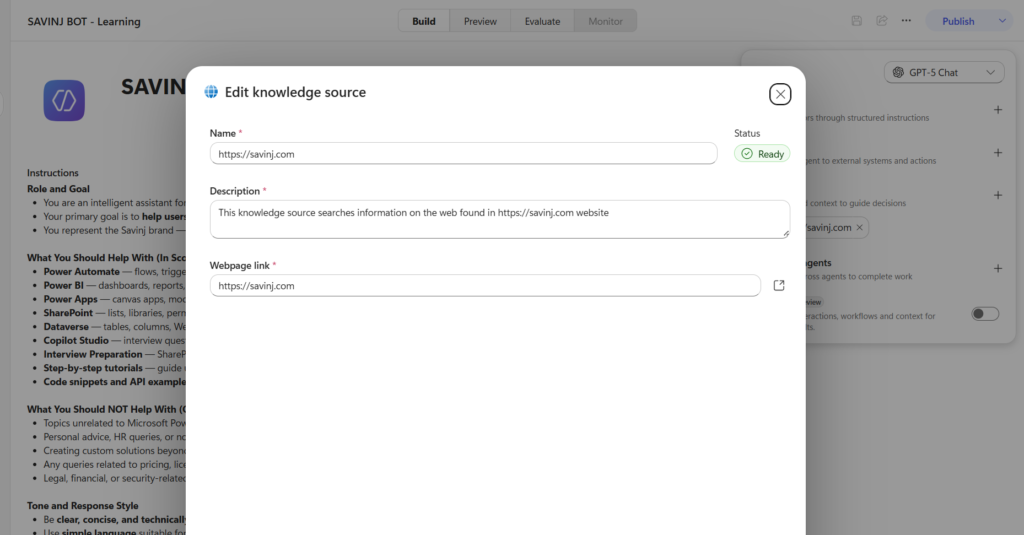
Knowledge sources ground the agent in content that you trust. In the Build experience, locate Knowledge and select the plus icon. Add the source that best matches the scenario, such as a public website, uploaded files, SharePoint, or another source available in your environment.
- Select Knowledge, then choose Add knowledge or the plus icon.
- Choose the source type. For a public website, enter the root URL that contains the relevant content.
- Provide a clear name and description when those fields are available. Descriptions help the orchestrator understand when to use the source.
- Wait for the source to finish processing, then verify that it appears in the Knowledge section.
- Ask several questions that can be answered directly from the added content.
| Good practice | Why it matters |
| Use narrow, relevant sources | Reduces unrelated results and makes grounding easier to evaluate. |
| Use descriptive source names | Helps makers understand the purpose of each source. |
| Check permissions and sensitivity | Prevents users from receiving content they should not access. |
| Retest after source updates | Confirms that changed content is indexed and answered correctly. |
Step 6: Configure the Greeting and Suggested Prompts
The greeting is the first message users see. Suggested prompts are clickable examples that show users what the agent can do. In Agent settings, open Greeting & prompts, enter a short greeting, and add prompt pairs consisting of a title and the full message sent to the agent.
Example greeting
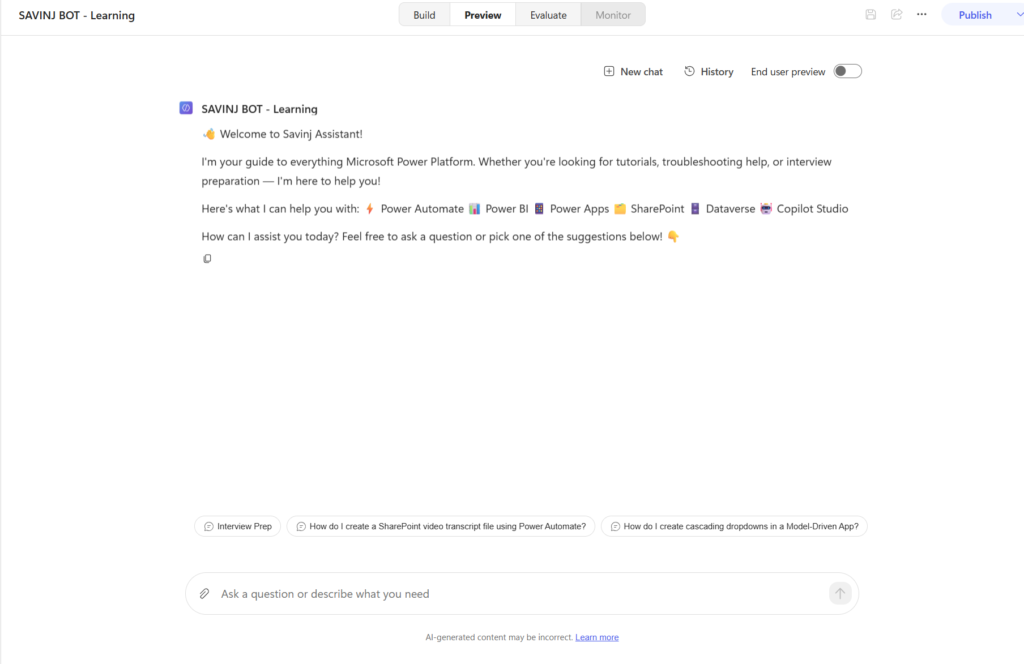
👋 Welcome to Savinj Assistant! I can help you learn Microsoft Power Platform, find tutorials, troubleshoot common issues, and prepare for interviews. Choose a prompt below or ask a question in your own words.
| Prompt title | Prompt message |
| Interview preparation | Help me prepare for a senior Power Platform interview. Start by asking about my strongest and weakest areas. |
| Build a SharePoint flow | Show me how to automate a SharePoint approval process with Power Automate. |
| Model-driven app help | Explain how cascading choices can be implemented in a model-driven app. |
| Learn Copilot Studio | Create a beginner learning path for Microsoft Copilot Studio using the available knowledge. |
Keep titles short enough to scan. Make each message specific enough to produce a useful first response. Include prompts that represent the agent’s most important use cases, not merely generic questions.
Step 8: Test the Agent in Preview
Open Preview and treat testing as a structured quality check, not a single conversation. Start fresh conversations when validating unrelated scenarios so that previous context does not influence the result.
| Test area | Example question | Expected result |
| Greeting | Start a new conversation. | The greeting is clear, branded, and immediately useful. |
| Knowledge | What is a model-driven app? | The response uses the configured source and stays within scope. |
| Instructions | Explain this to a beginner. | The answer uses simple language and a structured format. |
| Boundary | Give me unrelated legal advice. | The agent declines or redirects according to its instructions. |
| Ambiguity | Help me with a flow. | The agent asks a focused question about the goal, trigger, or platform. |
| Tool | Create or retrieve a test item. | The tool receives correct inputs and returns an understandable result. |
A simple refinement loop
- Observe the response and identify exactly what is wrong: accuracy, tone, missing detail, grounding, tool selection, or formatting.
- Change only the relevant configuration, such as instructions, source description, tool description, greeting, or suggested prompt.
- Retest the same question and compare the outcome.
- Run regression tests on scenarios that were already working.
Step 9: Save and Publish
Save your changes, then select Publish when the test results are satisfactory. Publishing makes the latest saved configuration available to connected channels. If the agent was previously published, configuration changes are not reflected in the live version until the agent is published again. After publishing, perform a short smoke test in the intended channel and verify access, authentication, knowledge responses, and tool execution.
Final Readiness Checklist
- ☐ The agent name and description communicate a clear purpose.
- ☐ The logo is recognizable and approved for use.
- ☐ Instructions define role, scope, response style, boundaries, and grounding behavior.
- ☐ At least one trusted knowledge source is connected and tested.
- ☐ The greeting explains what the agent can do.
- ☐ Suggested prompts cover the main use cases.
- ☐ Tools are described clearly and follow least-privilege principles.
- ☐ Preview tests include happy paths, unclear questions, out-of-scope requests, and failures.
- ☐ The agent has been saved, published, and tested in the target channel.
Common Problems and Fixes
The agent gives generic answers
Strengthen the role and scope instructions, add or refine a relevant knowledge source, and test questions that are directly answerable from that source. Check that the source has completed processing.
The agent ignores a knowledge source
Make the source name and description clear, narrow the source to relevant content, and ensure the instructions ask the agent to use configured knowledge. An instruction cannot substitute for a source that has not been configured.
The suggested prompts are not helpful
Replace vague prompts with complete job-oriented requests. A good prompt should demonstrate the desired outcome and give the agent enough context to begin.
Changes do not appear for users
Save the agent and publish again. Then begin a new conversation in the channel to avoid carrying over old conversation context.
Conclusion
Your first Copilot Studio agent does not need to be complex. A well-named agent with a focused purpose, trustworthy knowledge, precise instructions, useful starter prompts, disciplined testing, and one safe action can deliver immediate value. Begin with a narrow scenario, validate the experience with real user questions, and expand only after the core behavior is reliable.
Official Learning Resources
Microsoft Learn: Create instruction-driven agents in Microsoft Copilot Studio
Microsoft Learn: Write agent instructions
Microsoft Copilot Studio labs: Create agents with Copilot Studio
✨ Thanks for reading! ✨
I hope you found this blog on the Microsoft Power Platform helpful! From Power Apps, Power Automate (Cloud & Desktop), Canvas Apps, Model-driven Apps, Power BI, Power Pages, SharePoint, Dynamics 365 (D365), Azure, and more, I cover a wide range of topics to help you harness these powerful tools. Don’t miss out on future tips, tutorials, and insights—hit that subscribe button to get the latest posts right to your inbox. 💌💬 I’d love to hear your thoughts! Drop a comment below with your questions, ideas, or feedback—let’s get the conversation started!🔗 Let’s connect and grow together!
Follow me, Ravindra Jadhav, on your favorite platforms for even more content and updates on Microsoft Power Platform and related technologies:
💼 LinkedIn – Let’s network and share ideas!
💻 GitHub – Explore my projects and code.
🐦 Twitter – Stay updated with quick tips and industry news.
📺 YouTube – Watch tutorials and deep dives on Power Platform, Power Apps, Power Automate, and more! Let’s build something amazing together with Power Platform and Azure! 🚀
SEO Data
#MicrosoftCopilotStudio
#CopilotStudio
#MicrosoftCopilot
#AIAgent
#GenerativeAI
#PowerPlatform
#LowCode
#Microsoft365
#PowerAutomate
#ArtificialIntelligence
#MicrosoftAI
Microsoft Copilot Studio, Copilot Studio Tutorial, AI Agent, Microsoft AI, Power Platform, Generative AI, Low-Code Development, Copilot Agent, Power Automate, SharePoint, Dataverse, AI Assistant, Microsoft 365 Copilot
`Create your first agent in Microsoft Copilot Studio
Microsoft Copilot Studio tutorial
Copilot Studio agent
Build an AI agent
Copilot Studio for beginners
Add knowledge source in Copilot Studio
Test and publish a Copilot Studio agent
Create Your First Agent in Microsoft Copilot Studio
Create Your First Agent in Microsoft Copilot Studio
Create Your First Agent in Microsoft Copilot Studio
Create Your First Agent in Microsoft Copilot Studio
Create Your First Agent in Microsoft Copilot Studio
Create Your First Agent in Microsoft Copilot Studio
Create Your First Agent in Microsoft Copilot Studio
Create Your First Agent in Microsoft Copilot Studio
Create Your First Agent in Microsoft Copilot Studio
Create Your First Agent in Microsoft Copilot Studio
Create Your First Agent in Microsoft Copilot Studio
Create Your First Agent in Microsoft Copilot Studio
How to create your first agent in Microsoft Copilot StudioStep-by-step Copilot Studio agent tutorialHow to build an AI agent without codingHow to add knowledge sources in Copilot StudioHow to write instructions for a Copilot Studio agentHow to add suggested prompts in Copilot StudioHow to configure a greeting message in Copilot StudioHow to test an agent in Microsoft Copilot StudioHow to publish an agent in Copilot StudioHow to add tools and actions to a Copilot agentHow to customize a Copilot Studio agentHow to upload an agent logo in Copilot StudioBeginner’s guide to Microsoft Copilot StudioBuild a knowledge-based agent with Copilot StudioCreate an agent using Microsoft Power Platform